从事IOT行业,难免需要与硬件打交道;
今天正好领导要求,让我使用树莓派通过GPIO从DHT11温湿度传感器上采集温湿度信息,并将温湿度信息存到一个指定的H2DB中;
一、学习本章节的基础
首先,你得懂python,至少得能看懂我的代码,知道如何使用pip安装依赖包;
其次,你得懂树莓派,树莓派其实就是一个简单的Linux系统(ubuntu);
再然后,你得懂GPIO,知道如何去接线,知道哪些针应该连到哪个触角上;
最后,你还得懂H2DB,这个数据库虽然不难,有点类似于mysql,但毕竟工作中用的少!
二、直接上手开干
1、了解DHT11温湿度传感的线路图:
可以参考本篇文章:https://blog.csdn.net/weixin_54039182/article/details/124854207

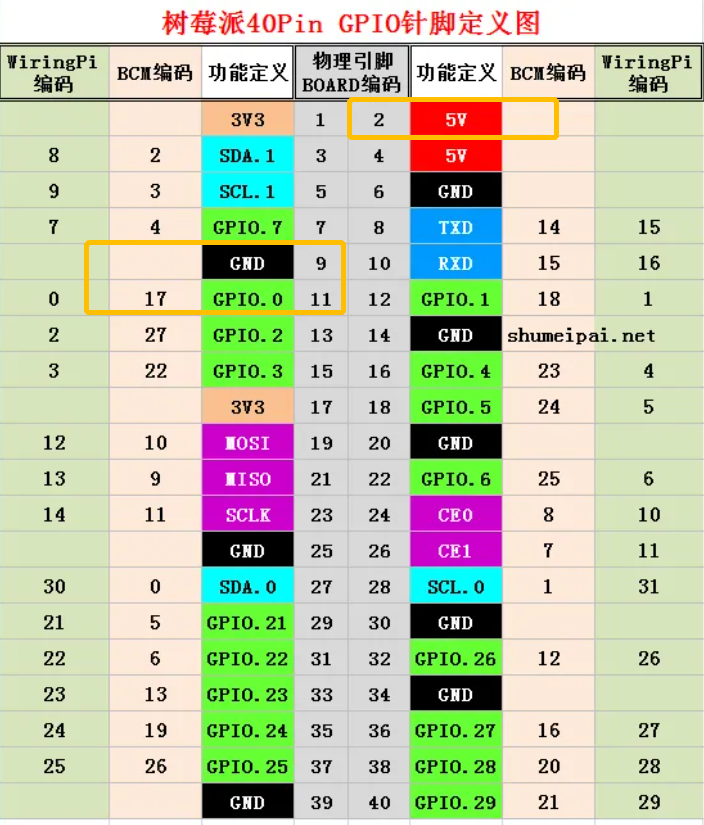
2、了解GPIO的引脚对应表:

其中土黄色圈出来的引脚,是我选择使用的引脚!
3、编写python脚本(包含DHT11的读取和数据库写入的逻辑):
import RPi.GPIO as GPIO
import jaydebeapi
import time

DHTPIN = 17

GPIO.setmode(GPIO.BCM)

MAX_UNCHANGE_COUNT = 100

STATE_INIT_PULL_DOWN = 1
STATE_INIT_PULL_UP = 2
STATE_DATA_FIRST_PULL_DOWN = 3
STATE_DATA_PULL_UP = 4
STATE_DATA_PULL_DOWN = 5

def read_dht11_dat():
   GPIO.setup(DHTPIN, GPIO.OUT)
   GPIO.output(DHTPIN, GPIO.HIGH)
   time.sleep(0.05)
   GPIO.output(DHTPIN, GPIO.LOW)
   time.sleep(0.02)
   GPIO.setup(DHTPIN, GPIO.IN, GPIO.PUD_UP)

   unchanged_count = 0
   last = -1
   data = []
   while True:
      current = GPIO.input(DHTPIN)
      data.append(current)
      if last != current:
         unchanged_count = 0
         last = current
      else:
         unchanged_count += 1
         if unchanged_count > MAX_UNCHANGE_COUNT:
            break

   state = STATE_INIT_PULL_DOWN

   lengths = []
   current_length = 0

   for current in data:
      current_length += 1

      if state == STATE_INIT_PULL_DOWN:
         if current == GPIO.LOW:
            state = STATE_INIT_PULL_UP
         else:
            continue
      if state == STATE_INIT_PULL_UP:
         if current == GPIO.HIGH:
            state = STATE_DATA_FIRST_PULL_DOWN
         else:
            continue
      if state == STATE_DATA_FIRST_PULL_DOWN:
         if current == GPIO.LOW:
            state = STATE_DATA_PULL_UP
         else:
            continue
      if state == STATE_DATA_PULL_UP:
         if current == GPIO.HIGH:
            current_length = 0
            state = STATE_DATA_PULL_DOWN
         else:
            continue
      if state == STATE_DATA_PULL_DOWN:
         if current == GPIO.LOW:
            lengths.append(current_length)
            state = STATE_DATA_PULL_UP
         else:
            continue
   if len(lengths) != 40:
      return False

   shortest_pull_up = min(lengths)
   longest_pull_up = max(lengths)
   halfway = (longest_pull_up + shortest_pull_up) / 2
   bits = []
   the_bytes = []
   byte = 0

   for length in lengths:
      bit = 0
      if length > halfway:
         bit = 1
      bits.append(bit)
   for i in range(0, len(bits)):
      byte = byte << 1
      if (bits[i]):
         byte = byte | 1
      else:
         byte = byte | 0
      if ((i + 1) % 8 == 0):
         the_bytes.append(byte)
         byte = 0
   checksum = (the_bytes[0] + the_bytes[1] + the_bytes[2] + the_bytes[3]) & 0xFF
   if the_bytes[4] != checksum:
      return False

   return the_bytes[0], the_bytes[2]

def main():
   print("启动从GPIO获取温湿度信息,并写入h2db的程序")
   driver = 'org.h2.Driver'
   url = 'jdbc:h2:tcp://172.16.10.213:9123/mem:kuradb;DB_CLOSE_DELAY=-1'
   username = 'sa'
   password = ''
   originSql = 'insert into telemetry(temperature, humidity) values(%.2f, %.2f)'
   jar = '/jiguiquan/h2-1.4.200.jar'
   conn = jaydebeapi.connect(driver, url, [username, password], jar)
   curs = conn.cursor()

   try:
      while True:
         result = read_dht11_dat()
         if result:
            humidity, temperature = result
            insertSql = originSql % (temperature, humidity / float(100))
            curs.execute(insertSql)
            if curs.rowcount > 0:
               print("本轮插入h2db成功,温度为:%.2f,湿度为:%.2f" % (temperature, humidity / float(100)))
            else:
               print("本轮插入h2db失败,温度为:%.2f,湿度为:%.2f" % (temperature, humidity / float(100)))
         time.sleep(1)
   finally:
      curs.close()
      conn.close()

def destroy():
   GPIO.cleanup()

if __name__ == '__main__':
   try:
      main()
   except KeyboardInterrupt:
      destroy()
4、要想运行的上面的python程序,需要我们安装一些依赖:
# 检查一下环境
root@raspberrypi:~# python -V
Python 3.9.2
root@raspberrypi:~# pip -V
pip 20.3.4 from /usr/lib/python3/dist-packages/pip (python 3.9)

## 安装RPi.GPIO
root@raspberrypi:~# pip install RPi.GPIO

## 安装jaydebeapi
root@raspberrypi:~# pip install jaydebeapi
5、由于使用的jdbc连接h2db,所以还需要使用到连接h2的jar包:
root@raspberrypi:/jiguiquan# pwd
/jiguiquan
root@raspberrypi:/jiguiquan# ls
h2-1.4.200.jar	jiguiquan.py
6、在h2db数据库中创建我们需要的telemetry表:
CREATE TABLE telemetry(id INTEGER AUTO_INCREMENT PRIMARY KEY, temperature DOUBLE, humidity DOUBLE, ts timestamp NOT NULL DEFAULT CURRENT_TIMESTAMP);
7、nohup运行jiguiquan.py,并查看日志:
nohup python -u jiguiquan.py > jiguiquan.log 2>&1 &
# 因为python的输出有缓冲,导致nohup.out并不能够马上看到输出,所以我们可以通过 -u关闭python缓冲!

## 查看nohup日志:
root@raspberrypi:/jiguiquan# tail -f -n 50 jiguiquan.log
启动从GPIO获取温湿度信息,并写入h2db的程序
本轮插入h2db成功,温度为:25.00,湿度为:0.46
本轮插入h2db成功,温度为:25.00,湿度为:0.46
本轮插入h2db成功,温度为:25.00,湿度为:0.46
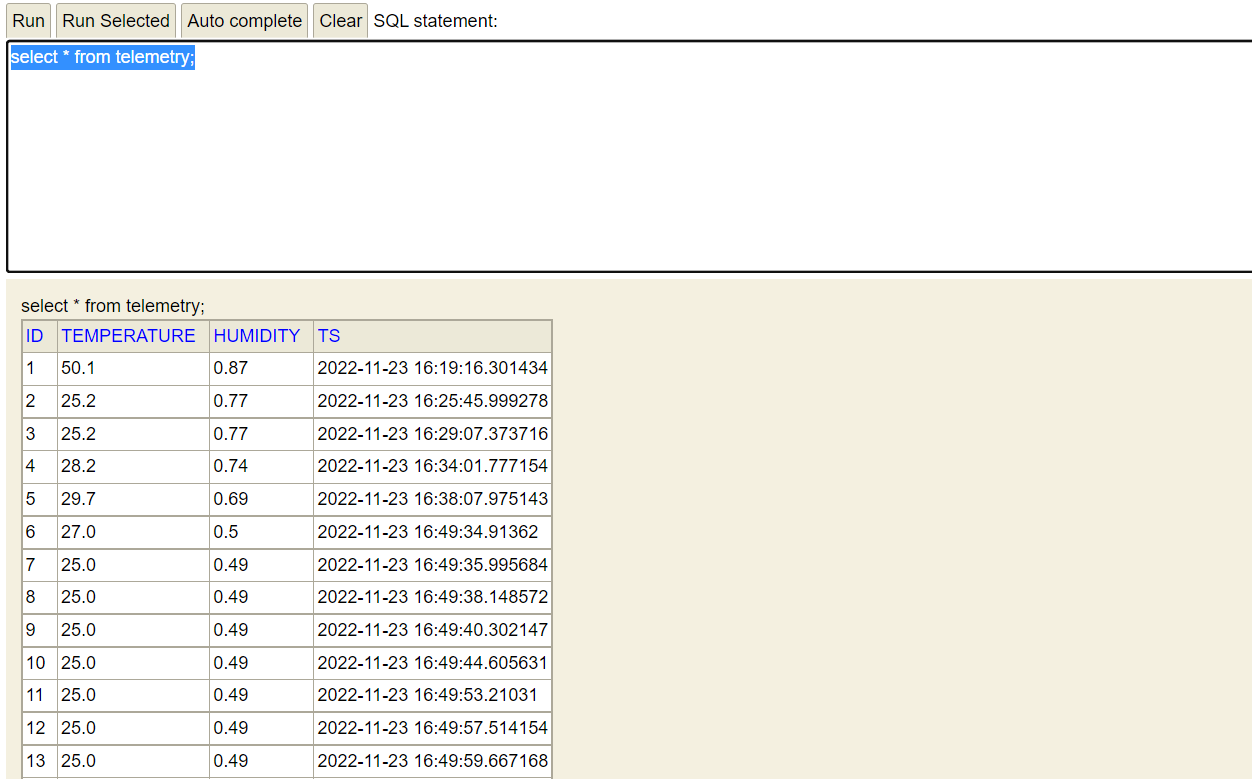
8、我们去h2db数据库看看,数据是否写入成功:
有些时候,我们为了节约h2db的存储空间,还可以使用update代替insert!
update telemetry set temperature= %.2f, humidity = %.2f, ts = CURRENT_TIMESTAMP where id =1;


