Sentinel的工作原理:https://github.com/alibaba/Sentinel/wiki
-
Sentinel会为所有的资源,以资源名为区分,创建各自的DefaultProcessorSlotChain,放在缓存中;
-
DefaultProcessorSlotChain的9个ProcessorSlot插槽都是通过SPI机制从 META/services/ 目录下加载的;
-
每一个ProcessorSlot 其实是一个 AbstractLinkedProcessorSlot 抽象链表处理器插槽,
有一个next属性,指向下一个Slot,当某一个Slot执行完后,会调用fireEntry()方法,
将请求转到下一个Slot继续执行。
-
最终完成责任链上所有ProcessorSlot的逻辑!
-
——————————————————————————————————————————————
-
Context链路上下文为request请求级别的,放在ThreadLocal中,请求结束即释放;
-
entranceNode是应用级别的,创建完成后,会缓存起来(key为contextName),下一个请求可以继续使用;
-
processorSlotChain也是应用级别的,创建完成后,会缓存起来(key为resourceName),下一个请求可以继续使用;
一、ProcessorSlotChain处理器插槽链和Node节点的引入
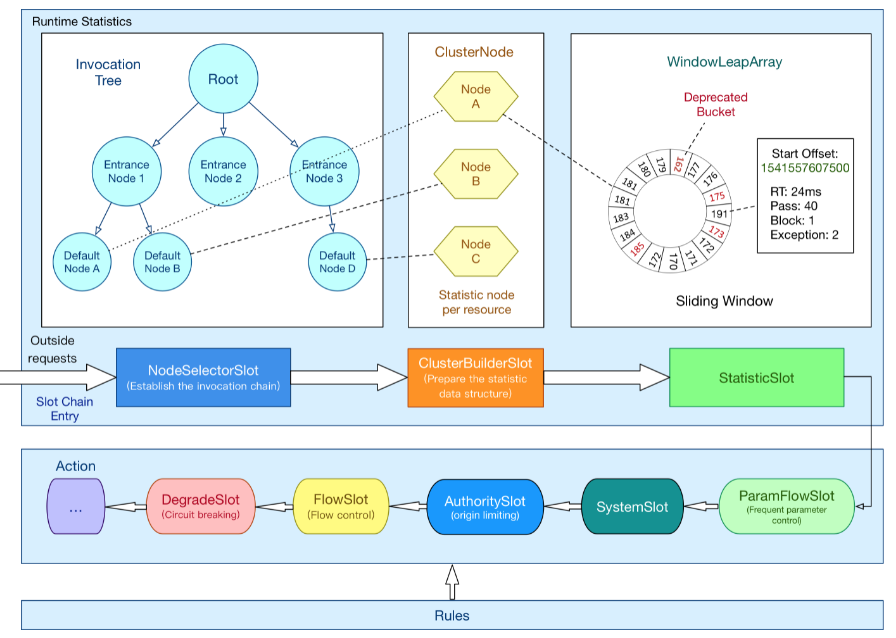
首先,根据官方Wiki中的图,我们可以很形象地看到,整个请求处理过程就像一个链条一样,一步步地向后执行,这是一种典型地“责任链模式”;
责任链模式 —— 为请求创建一个接收者对象的链,链上的每一个节点服务处理各自的业务逻辑,实现解耦,每一个处理者节点记录着下一个节点的引用,请求将沿着这条链被传递下去,以此处理对应的逻辑。
1、ProcessorSlotChain处理器插槽链的引入
ProcessorSlotChain是上图整个链的骨架,基于“责任链模式”设计,将“统计、授权、限流、降级等”处理逻辑封装成一个个的Slot插槽,串联起来。
处理链中的Slot插槽可粗分为上下两大类:数据统计部分 + 规则判断部分
-
数据统计:
-
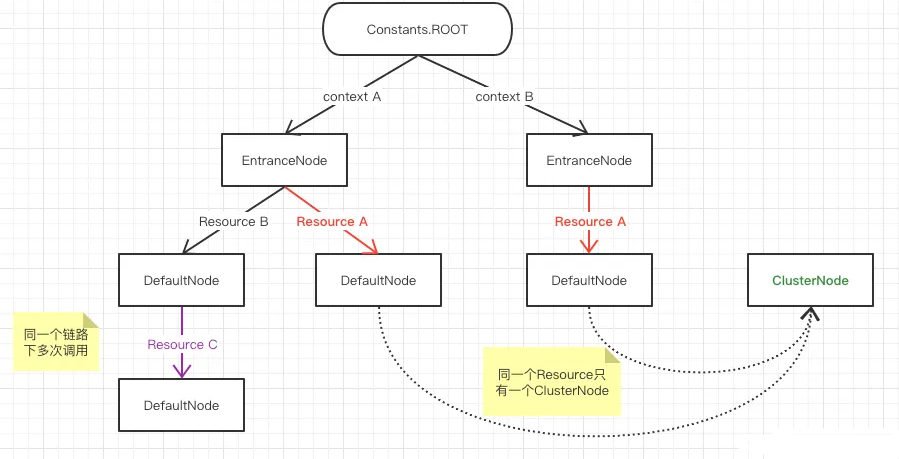
NodeSelectorSlot:负责构建簇点链路中的各个节点(DefaultNode),形成NodeTree
-
ClusterBuilderSlot:负责构建某个资源的ClusterNode(具体的DefaultNode和ClusterNode的区别见下文)
-
StatisticSlot:负责实时统计请求的各种调用信息,如来源信息、请求次数、运行信息等;
-
规则判断:
-
AuthoritySlot:授权规则判断(来源控制)
-
SystemSlot:系统保护规则判断,当系统资源使用量达到一定程度后,拒绝新的请求进入等;
-
ParamFlowSlot:热点参数限流规则判断
-
FlowSolt:普通限流规则判断
-
DegradeSlot:降级规则判断
2、为什么要存在NodeSelectorSlot和ClusterBuilderSlot两个插槽?DefaultNode和ClusterNode有什么区别?

-
DefaultNode:同一份资源,经过不同的链路调用,会创建不同的DefaultNode,记录不同链路访问当前资源的统计元数据,因为整个Sentinel是支持“根据链路限流”的,所以肯定要分开统计;
-
ClusterNode:同一份资源,在整个系统中只会创建一个ClusterNode,记录所有入口访问当前资源的统计元数据,因为很多时候,我们只需要统计该资源的整体使用情况。
注意这里的用词,DefaultNode和ClusterNode都只是负责记录统计元数据,真正的统计工作由之后的StatisticSlot进行,另外ParmFlowSlot会负责热点参数限流这种特殊场景下的数据统计。(热点参数限流的统计为什么要单独出来,后面做限流算法实现的讲解时就清楚了)。
3、如何自定义一个Sentinel资源?@SentinelResource注解?
我们知道,在实际使用过程中,当我们要自定义sentinel资源时,只需要使用@SentinelResource注解定义即可,很方便。
而且Sentinel默认就已经将 springmvc 的 controller 中的方法注册为sentinel资源了,但是这些方法并没有添加 @SentinelResource 注解呀!
其实@SentinelResource底层也就是通过AOP + Entry 的方式来手动注册 Sentinel资源的:
// 资源名可使用任意有业务语义的字符串,比如方法名、接口名或其它可唯一标识的字符串。
try (Entry entry = SphU.entry("resourceName")) {
  // 被保护的业务逻辑
  // do something here...
} catch (BlockException ex) {
  // 资源访问阻止,被限流或被降级
  // 在此处进行相应的处理操作
}
SentinelResourceAspect切面类:
@Aspect
public class SentinelResourceAspect extends AbstractSentinelAspectSupport {

    @Pointcut("@annotation(com.alibaba.csp.sentinel.annotation.SentinelResource)")
    public void sentinelResourceAnnotationPointcut() {

    }

    // 经典AOP实现
    @Around("sentinelResourceAnnotationPointcut()")
    public Object invokeResourceWithSentinel(ProceedingJoinPoint pjp) throws Throwable {
        Method originMethod = this.resolveMethod(pjp);
        SentinelResource annotation = (SentinelResource)originMethod.getAnnotation(SentinelResource.class);
        if (annotation == null) {
            throw new IllegalStateException("Wrong state for SentinelResource annotation");
        } else {
            String resourceName = this.getResourceName(annotation.value(), originMethod);
            EntryType entryType = annotation.entryType();
            int resourceType = annotation.resourceType();
            Entry entry = null;

            try {
                Object var18;
                try {
                    // 注册对应的资源
                    entry = SphU.entry(resourceName, resourceType, entryType, pjp.getArgs());
                    // 执行具体的业务逻辑
                    return pjp.proceed();
                } catch (Exception e) {
                    ......
                }
            } finally {
                ......
            }
        }
    }
}
所以,通过Entry手动注册资源 和 通过@SentinelResource 注解自动注入资源,原理上时一样的,都是通过 SphU.entry(…) 方法实现。
4、链路上下文Context
public class Context {

    private final String name;

    private DefaultNode entranceNode;

    private Entry curEntry;

    private String origin = "";

    private final boolean async;
}
-
Context代表调用链路的上下文,贯穿一次链路调用中的所有资源(Entry),基于ThreadLocal实现;
-
Context维护者入口节点(entranceNode)、当前资源节点(curEntry —>curNode)、调用来源origin等信息;
-
后续所有的Slot插槽都可以通过context拿到DefaultNode 和 ClusterNode,从而完成统计或判断逻辑;
-
Context创建过程中,会创建EntranceNode,contextName 就是entranceNode的名称;
// 创建context,包含两个参数:context名称、 来源名称
ContextUtil.enter("contextName", "originName");
-
默认情况下,Sentinel的entranceNode是sentinel_default_context,如果我们要想做链路限流,就必须关闭“统一入口配置”,从而让每一个Controller方法为Context的入口。
public final static String CONTEXT_DEFAULT_NAME = "sentinel_default_context";
spring:
  cloud:
    sentinel:
      web-context-unify: false  # 关闭context统一入口配置
二、Sentinel源码剖析——Context的初始化
1、spring-cloud-starter-alibaba-sentinel 的 spring.factory 中有两个相关的自动装配类:

由于,Context的初始化,涉及到了将Controller中的方法定义为entranceNode的过程,所以肯定是看 SentinelWebAutoConfiguration 这个自动装配类!
2、向 springmvc 处理链中添加一个Sentinel的拦截器:
@Configuration(
    proxyBeanMethods = false  // Lite模式,关闭Full模式
)
@ConditionalOnWebApplication(
    type = Type.SERVLET
)
@ConditionalOnProperty(
    name = {"spring.cloud.sentinel.enabled"},
    matchIfMissing = true
)
@ConditionalOnClass({SentinelWebInterceptor.class})
@EnableConfigurationProperties({SentinelProperties.class})
public class SentinelWebAutoConfiguration implements WebMvcConfigurer {

    // 通过实现 WebMvcConfigurer 接口,允许了手动向springmvc中添加拦截器 Interceptor

    ......

    // 注入本类下文定义的SentinelWebInterceptor
    @Autowired
    private Optional<SentinelWebInterceptor> sentinelWebInterceptorOptional;

    public SentinelWebAutoConfiguration() {
    }

    // 添加
    public void addInterceptors(InterceptorRegistry registry) {
        if (this.sentinelWebInterceptorOptional.isPresent()) {
            Filter filterConfig = this.properties.getFilter();
            registry.addInterceptor((HandlerInterceptor)this.sentinelWebInterceptorOptional.get())
                .order(filterConfig.getOrder()).addPathPatterns(filterConfig.getUrlPatterns());
        }
    }

    // 向 IOC 容器中注入一个 SentinelWebInterceptor 拦截器
    @Bean
    @ConditionalOnProperty(
        name = {"spring.cloud.sentinel.filter.enabled"},
        matchIfMissing = true
    )
    public SentinelWebInterceptor sentinelWebInterceptor(SentinelWebMvcConfig sentinelWebMvcConfig) {
        return new SentinelWebInterceptor(sentinelWebMvcConfig);
    }

}
3、SentinelWebInterceptor拦截器的核心方法:
SentinelWebInterceptor 中会对父类 AbstractSentinelInterceptor 中的抽象方法做实现(模板方法模式):
public class SentinelWebInterceptor extends AbstractSentinelInterceptor {

    // 获取resourceName:
    // controller中请求方法的路径(资源):/order/{orderId}
    protected String getResourceName(HttpServletRequest request) {
        Object resourceNameObject = request.getAttribute(HandlerMapping.BEST_MATCHING_PATTERN_ATTRIBUTE);
        if (resourceNameObject != null && resourceNameObject instanceof String) {
            String resourceName = (String)resourceNameObject;
            UrlCleaner urlCleaner = this.config.getUrlCleaner();
            if (urlCleaner != null) {
                resourceName = urlCleaner.clean(resourceName);
            }

            if (StringUtil.isNotEmpty(resourceName) && this.config.isHttpMethodSpecify()) {
                resourceName = request.getMethod().toUpperCase() + ":" + resourceName;
            }

            return resourceName;
        } else {
            return null;
        }
    }

    // 获取contextName:
    // 如果开启了统一入口配置,则contextName就是默认的统一入口:sentinel_spring_web_context
    // 如果关闭了统一入口配置,则contextName就是当前资源的名称;
    protected String getContextName(HttpServletRequest request) {
        return this.config.isWebContextUnify() ? super.getContextName(request) : this.getResourceName(request);
    }
}
而作为一个拦截器,最重要的逻辑,肯定是在 prehandler() 中:
public abstract class AbstractSentinelInterceptor implements HandlerInterceptor {

    public static final String SENTINEL_SPRING_WEB_CONTEXT_NAME = "sentinel_spring_web_context";
    private static final String EMPTY_ORIGIN = "";
    private final BaseWebMvcConfig baseWebMvcConfig;

    // 前置拦截的核心逻辑
    public boolean preHandle(HttpServletRequest request, HttpServletResponse response, Object handler) throws Exception {
        try {
            // 获取资源名称,一般是controller方法的@RequestMapping路径,例如/order/{orderId}
            String resourceName = this.getResourceName(request);
            if (StringUtil.isEmpty(resourceName)) {
                return true;
            } else if (this.increaseReferece(request, this.baseWebMvcConfig.getRequestRefName(), 1) != 1) {
                return true;
            } else {
                // 从request中获取请求来源,将来做 授权规则(来源控制) 判断时会用
                String origin = this.parseOrigin(request);

                // 获取 contextName,默认是sentinel_spring_web_context;
                // 如果关闭统一入口,那就是当前resourceName
                String contextName = this.getContextName(request);
                // 创建Context核心方法
                ContextUtil.enter(contextName, origin);

                // 构建ProcessorSlotChain处理器插槽链的核心逻辑
                Entry entry = SphU.entry(resourceName, 1, EntryType.IN);
                request.setAttribute(this.baseWebMvcConfig.getRequestAttributeName(), entry);
                return true;
            }
        } catch (BlockException var12) {
            BlockException e = var12;

            try {
                this.handleBlockException(request, response, e);
            } finally {
                ContextUtil.exit();
            }

            return false;
        }
    }

    // 当请求体业务处理完成后,关闭所有的资源
    public void afterCompletion(HttpServletRequest request, HttpServletResponse response, Object handler, Exception ex) throws Exception {
        if (this.increaseReferece(request, this.baseWebMvcConfig.getRequestRefName(), -1) == 0) {
            Entry entry = this.getEntryInRequest(request, this.baseWebMvcConfig.getRequestAttributeName());
            if (entry == null) {
                ...Log...
            } else {
                this.traceExceptionAndExit(entry, ex);  // entry.exit()退出
                this.removeEntryInRequest(request);
                ContextUtil.exit();  // contextHolder.set(null);
            }
        }
    }
}

// private static ThreadLocal<Context> contextHolder = new ThreadLocal<>(); // 保存context的threadLocal
4、ContextUtil.enter(contextName, origin) 创建Context核心方法:
// com.alibaba.csp.sentinel.context.ContextUtil#enter
public static Context enter(String name, String origin) {
    // "sentinel_default_context"是不允许被创建的
    if (Constants.CONTEXT_DEFAULT_NAME.equals(name)) {
        throw new ContextNameDefineException(
            "The " + Constants.CONTEXT_DEFAULT_NAME + " can't be permit to defined!");
    }
    return trueEnter(name, origin);
}
|
|
// com.alibaba.csp.sentinel.context.ContextUtil#trueEnter
protected static Context trueEnter(String name, String origin) {
    // 尝试获取context,一般一个新的请求到达后,获取context肯定为null
    Context context = contextHolder.get();
    // 判空
    if (context == null) {
        // 如果为空,开始初始化
        Map<String, DefaultNode> localCacheNameMap = contextNameNodeMap;
        // 尝试获取入口节点
        DefaultNode node = localCacheNameMap.get(name);
        if (node == null) {
            LOCK.lock();
            try {
                node = contextNameNodeMap.get(name);
                if (node == null) { // 双重检测锁
                    // 入口节点为空,初始化入口节点 EntranceNode
                    node = new EntranceNode(new StringResourceWrapper(name, EntryType.IN), null);
                    // 添加入口节点到 ROOT,所有的节点共用一个ROOT根节点
                    Constants.ROOT.addChild(node);
                    // 将入口节点放入缓存(下次请求时候,根据contextName获取,可直接使用)
                    Map<String, DefaultNode> newMap = new HashMap<>(contextNameNodeMap.size() + 1);
                    newMap.putAll(contextNameNodeMap);
                    newMap.put(name, node);
                    contextNameNodeMap = newMap; // CopyOnWrite
                }
            } finally {
                LOCK.unlock();
            }
        }
        // 创建Context,参数为:入口节点 和 contextName
        context = new Context(node, name);
        // 设置请求来源 origin
        context.setOrigin(origin);
        // 将context放入ThreadLocal
        contextHolder.set(context);
    }
    // 返回
    return context;
}
由此我们可以得出重要结论:
在每一个请求到达时,Sentinel的拦截器都会为本次请求封装一个“链路上下文context”,然后放入到ThreadLocal中,便于请求在后面的处理过程中取用;
默认情况下,“统一入口配置开启”,“链路上下文context”以sentinel-spring-web-context 命名;
如果关闭了“统一入口配置”,“链路上下文context”将以本次请求对应的controller方法的 @RequestMapping() 的值命名,如“/order/{orderId}”;
由于context是放在Thread中的,所以当本次请求结束后,context就会被释放,下次请求需要重新创建;(context生命周期为request)
但是入口 entranceNode 却是放在缓存HashMap中的,所以下一次新的请求到达时,就没有必要再重新创建了;(entranceNode生命周期为应用级)
创建入口方法entranceNode时,使用了双重检测锁 + CopyOnWrite,因为存在多个请求线程并发情况;
创建context过程不需要考虑多线程安全,原因也是因为context时线程内的,单线程。
三、Sentinel核心源码之ProcessorSlotChain的构建
1、入口方法,正式上文拦截器中创建Context之后的方法:
Entry entry = SphU.entry(resourceName, 1, EntryType.IN);
该方法,将“一脉单传”调用到以下方法 entryWithPriority() :
private Entry entryWithPriority(ResourceWrapper resourceWrapper, int count, boolean prioritized, Object... args)
    throws BlockException {
    // 获取 Context
    Context context = ContextUtil.getContext();

    if (context == null) {
        // Using default context.
        context = InternalContextUtil.internalEnter(Constants.CONTEXT_DEFAULT_NAME);
    }
	// 获取 Slot执行链,同一个资源(如:/order/{orderId}),会创建一个执行链,放入缓存
    ProcessorSlot<Object> chain = lookProcessChain(resourceWrapper);

	// 创建 Entry,并将 resource、chain、context 记录在 Entry中
    Entry e = new CtEntry(resourceWrapper, chain, context);
    try {
        // 执行 slotChain
        chain.entry(context, resourceWrapper, null, count, prioritized, args);
    } catch (BlockException e1) {
        // 如果执行 slotChain 过程中发生异常,也直接将对应的资源释放
        e.exit(count, args);
        ......
    }
    return e;
}
2、lookProcessChain() 创建或获取资源对应的ProcessorSlotChain的方法:
// com.alibaba.csp.sentinel.CtSph#lookProcessChain
ProcessorSlot<Object> lookProcessChain(ResourceWrapper resourceWrapper) {
    // 从缓存chainMap中获取
    ProcessorSlotChain chain = chainMap.get(resourceWrapper);
    if (chain == null) {
        synchronized (LOCK) {
            chain = chainMap.get(resourceWrapper);
            if (chain == null) {  // 又是双重检测锁
                // Entry size limit.
                if (chainMap.size() >= Constants.MAX_SLOT_CHAIN_SIZE) {
                    return null;
                }

                // 入口本资源对应的chain不存在,则创建一个新的
                chain = SlotChainProvider.newSlotChain();
                Map<ResourceWrapper, ProcessorSlotChain> newMap = new HashMap<ResourceWrapper, ProcessorSlotChain>(
                    chainMap.size() + 1);
                newMap.putAll(chainMap);
                newMap.put(resourceWrapper, chain);
                chainMap = newMap; // 又是CopyOnWrite
            }
        }
    }
    return chain;
}
虽然每一次请求的ResourceWrapper都是新new的,但是由于它的hashCode() 和 equals() 方法,只会对比 name;
public abstract class ResourceWrapper {

    protected final String name;

    protected final EntryType entryType;
    protected final int resourceType;

    @Override
    public int hashCode() {
        return getName().hashCode();
    }

    @Override
    public boolean equals(Object obj) {
        if (obj instanceof ResourceWrapper) {
            ResourceWrapper rw = (ResourceWrapper)obj;
            return rw.getName().equals(getName());
        }
        return false;
    }
}
所以,得出结论:
Sentinel会为所有的资源,以资源名为区分,创建对应的ProcessorSlotChain,并缓存到chainMap中;
ProcessorSlotChain应用级有效,创建后,下次相同名称的Resource请求进入时,将不需要再次创建chain;
3、SlotChainProvider.newSlotChain() 处理器插槽链的构建过程:
// com.alibaba.csp.sentinel.slotchain.SlotChainProvider#newSlotChain
public static ProcessorSlotChain newSlotChain() {
    if (slotChainBuilder != null) {
        return slotChainBuilder.build();
    }

    // 默认肯定是得到一个 DefaultSlotChainBuilder
    slotChainBuilder = SpiLoader.loadFirstInstanceOrDefault(SlotChainBuilder.class, DefaultSlotChainBuilder.class);

    if (slotChainBuilder == null) {
        slotChainBuilder = new DefaultSlotChainBuilder();
    } else {
        ......
    }
    return slotChainBuilder.build();
}
|
|
public class DefaultSlotChainBuilder implements SlotChainBuilder {

    @Override
    public ProcessorSlotChain build() {
        // 创建一个 DefaultProcessorSlotChain
        ProcessorSlotChain chain = new DefaultProcessorSlotChain();

        // 该方法会通过spi机制从 \META-INF\services\目录下,加载所有的ProcessorSlot类
        List<ProcessorSlot> sortedSlotList = SpiLoader.loadPrototypeInstanceListSorted(ProcessorSlot.class);
        for (ProcessorSlot slot : sortedSlotList) {
            if (!(slot instanceof AbstractLinkedProcessorSlot)) {
                continue;
            }

            // 最终创建的
            chain.addLast((AbstractLinkedProcessorSlot<?>) slot);
        }

        return chain;
    }
}
4、SpiLoader.loadPrototypeInstanceListSorted(ProcessorSlot.class)通过SPI机制加载所有的ProcessorSlot插槽类:
// com.alibaba.csp.sentinel.util.SpiLoader#loadPrototypeInstanceListSorted
public static <T> List<T> loadPrototypeInstanceListSorted(Class<T> clazz) {
    try {
        // Not use SERVICE_LOADER_MAP, to make sure the instances loaded are different.
        ServiceLoader<T> serviceLoader = ServiceLoaderUtil.getServiceLoader(clazz);

        List<SpiOrderWrapper<T>> orderWrappers = new ArrayList<>();

        // SPI机制会从本地的 META-INF/services/ 目录下加载 ProcessorSlot 列表;
        for (T spi : serviceLoader) {
            int order = SpiOrderResolver.resolveOrder(spi);
            // Since SPI is lazy initialized in ServiceLoader, we use online sort algorithm here.
            SpiOrderResolver.insertSorted(orderWrappers, spi, order);
        }
        List<T> list = new ArrayList<>(orderWrappers.size());
        for (int i = 0; i < orderWrappers.size(); i++) {
            list.add(orderWrappers.get(i).spi);
        }
        return list;
    } catch (Throwable t) {
        t.printStackTrace();
        return new ArrayList<>();
    }
}
本地 META/services/ 目录下的 ProcessorSlot文件定义了9个插槽!

5、最终构建成的ProcessorSlotChain的结构:
首先,所有的9大ProcessorSlot都继承于一个AbstractLinkedProcessorSlot类:
public abstract class AbstractLinkedProcessorSlot<T> implements ProcessorSlot<T> {

    private AbstractLinkedProcessorSlot<?> next = null;

    // fireEntry的作用主要就是让请求流转到下一个ProcessorSlot(如果存在的话)
    @Override
    public void fireEntry(Context context, ResourceWrapper resourceWrapper, Object obj, int count, boolean prioritized, Object... args)
        throws Throwable {
        if (next != null) {
            next.transformEntry(context, resourceWrapper, obj, count, prioritized, args);
        }
    }

    // 所有ProcessorSlot的入口方法,其中会通过模板方法模式,调用各自的entry处理逻辑
    // 而再所有的处理逻辑的最后,都会再调一次 fireEntry() 方法
    void transformEntry(Context context, ResourceWrapper resourceWrapper, Object o, int count, boolean prioritized, Object... args)
    throws Throwable {
        T t = (T)o;
        entry(context, resourceWrapper, t, count, prioritized, args);
    }
}
经过 next 指向,最终构建出来的 DefaultProcessorSlotChain 如下:

综上总结:
Sentinel会为所有的资源,以资源名为区分,创建各自的DefaultProcessorSlotChain,放在缓存中;
DefaultProcessorSlotChain的每一个ProcessorSlot插槽都是通过SPI机制从 META/services/ 目录下加载的;
每一个ProcessorSlot 其实是一个 AbstractLinkedProcessorSlot 抽象链表处理器插槽,有一个next属性,指向下一个Slot,当某一个Slot执行完后,会调用fireEntry()方法,将请求转到下一个Slot继续执行。
最终完成责任链上所有ProcessorSlot的逻辑!
四、九大ProcessorSlot处理器插槽的工作原理
LogSlot插槽是一个边缘插槽,做一些日志记录,所以不算重要,排除在外后,就剩8大插槽,也就是<第一章节>列出的八大插槽:
数据统计部分 + 规则判断部分
-
数据统计:
-
NodeSelectorSlot:负责构建簇点链路中的各个节点(DefaultNode),形成NodeTree
-
ClusterBuilderSlot:负责构建某个资源的ClusterNode(具体的DefaultNode和ClusterNode的区别见下文)
-
StatisticSlot:负责实时统计请求的各种调用信息,如来源信息、请求次数、运行信息等;
-
规则判断:
-
AuthoritySlot:授权规则判断(来源控制)
-
SystemSlot:系统保护规则判断,当系统资源使用量达到一定程度后,拒绝新的请求进入等;
-
ParamFlowSlot:热点参数限流规则判断
-
FlowSolt:普通限流规则判断
-
DegradeSlot:降级规则判断
其实,当Sentinel的整体架构,和调用逻辑梳理清楚后,每一个责任链节点的处理逻辑就很简单了,所以,以后有机会再补充吧。
略!


