一、总结前置:
1、ribbon、feign、openfeign三者的对比:
我们现在工作中现在几乎都是直接使用openfeign,而我们很有必要了解一下,ribbon、feign、openfeign三者之间的关系!
-
ribbon:ribbon是netflix开源的客户端负载均衡组件,可以调用注册中心获取服务列表,并通过负载均衡算法挑选一台Server;
-
feign:feign也是netflix开源的,是对ribbon的一层封装,通过接口的方式使用,更加优雅,不需要每次都去写restTemplate,只需要定义一个接口来使用;但是Feign不支持springmvc的注解;
-
openfeign:是对feign的进一步封装,使其能够支持springmvc注解,如@GetMapping等,使用起来更加方便和优雅!
2、工作中都是如何使用openfeign:
// 想要使用openfeign,必须要在启动类增加@EnableFeignClient注解,否则启动报错
@FeignClient("feign-provider")
public interface OrderService {

    @GetMapping("/order/get/{id}")
    public String getById(@PathVariable("id") String id);
}
3、openfeign与ribbon如何分工?
-
1. openfeign通过动态代理的方式,对feignclient注解修饰的类进行动态代理,拼接成临时URL:http://feign-provider/order/get/100,交给ribbon
-
2. ribbon通过自己的拦截器,截取出serviceName在服务注册表中找到对应的serverList,并通过负载均衡策略挑选一台Server,拼接成最终的URL:http://10.206.73.156:1111/order/get/100,交还给feign;
-
3. 最后,feign通过自己封装的Client对目标地址发起调用,并获得返回结果;(Client是对原生 java.net 中的URL类的封装,实现远程调用)
二、核心代码——Openfeign生成的动态代理类是啥?(LoadBalancerFeignClient.class)
1、启动类必须增加@EnableFeignClient,那我们就从这里入口:
@EnableFeignClients
|
|
@Import(FeignClientsRegistrar.class)
|
|
// 遇到import(Registrar),我们就去看它的registerBeanDefinitions()方法:
public void registerBeanDefinitions(AnnotationMetadata metadata,
      BeanDefinitionRegistry registry) {
   registerDefaultConfiguration(metadata, registry);

   // 注册FeignClient,其实FeignClient就是我们需要的动态代理类
   registerFeignClients(metadata, registry);
}
|
|
public void registerFeignClients(AnnotationMetadata metadata,BeanDefinitionRegistry registry) {
   ......
   // 定义过滤器,把加了@FeignClient注解的接口都过滤出来
   AnnotationTypeFilter annotationTypeFilter = new AnnotationTypeFilter(FeignClient.class);
   ...过滤逻辑...

   for (String basePackage : basePackages) {
      Set<BeanDefinition> candidateComponents = scanner
            .findCandidateComponents(basePackage);
      for (BeanDefinition candidateComponent : candidateComponents) {
         if (candidateComponent instanceof AnnotatedBeanDefinition) {
            // verify annotated class is an interface
            AnnotatedBeanDefinition beanDefinition = (AnnotatedBeanDefinition) candidateComponent;
            AnnotationMetadata annotationMetadata = beanDefinition.getMetadata();
            Assert.isTrue(annotationMetadata.isInterface(),
                  "@FeignClient can only be specified on an interface");

            Map<String, Object> attributes = annotationMetadata
                  .getAnnotationAttributes(
                        FeignClient.class.getCanonicalName());

            String name = getClientName(attributes);
            registerClientConfiguration(registry, name,
                  attributes.get("configuration"));

            // 将为每一个过滤出来的接口,注册FeignClient
            registerFeignClient(registry, annotationMetadata, attributes);
         }
      }
   }
}
|
|
private void registerFeignClient(BeanDefinitionRegistry registry,
      AnnotationMetadata annotationMetadata, Map<String, Object> attributes) {
   String className = annotationMetadata.getClassName();
   BeanDefinitionBuilder definition = BeanDefinitionBuilder
         .genericBeanDefinition(FeignClientFactoryBean.class);

   ...目标FactoryBean为FeignClientFactoryBean...
   ...FactoryBean一般用于定制化一些特殊的Bean,spring会调用它的getObject接口...

   BeanDefinitionHolder holder = new BeanDefinitionHolder(beanDefinition, className,
         new String[] { alias });
   BeanDefinitionReaderUtils.registerBeanDefinition(holder, registry);
}
2、见名知意FeignClient的工厂bean:FeignClientFactoryBean.getObject()方法:
class FeignClientFactoryBean{
    @Override
    public Object getObject() throws Exception {
       return getTarget();
    }

    <T> T getTarget() {
       FeignContext context = this.applicationContext.getBean(FeignContext.class);
       Feign.Builder builder = feign(context);

       // 当我们不为@FeignClient()注解配置url属性时
       // 这里同时会根据注解,拼接出url前缀,如:http://feign-provider
       if (!StringUtils.hasText(this.url)) {
          if (!this.name.startsWith("http")) {
             this.url = "http://" + this.name;
          }
          else {
             this.url = this.name;
          }
          this.url += cleanPath();
          return (T) loadBalance(builder, context,
                new HardCodedTarget<>(this.type, this.name, this.url));
       }

       ...如果我们为@FeignClient()注解配置url属性之后的逻辑...
    }
}
|
|
protected <T> T loadBalance(Feign.Builder builder, FeignContext context,
      HardCodedTarget<T> target) {
   // 从容器中获取一个类型为Client的bean,那么IOC容器中肯定有一个这样的Bean
   Client client = getOptional(context, Client.class);
   if (client != null) {
      builder.client(client);
      Targeter targeter = get(context, Targeter.class);
      return targeter.target(this, builder, context, target);
   }

   // 如果找不到类型为Client的Bean就是有问题的啦!
   throw new IllegalStateException(
         "No Feign Client for loadBalancing defined. Did you forget to include spring-cloud-starter-netflix-ribbon?");
}
3、容器中类型为Client的Bean是谁?
此时还是启动阶段,我们去看看有哪些bean会被注入,在 spring.factories 中,我们会找到两个自动配置类:

这两个类,很关键,都会往容器中注入负载均衡的Client Bean,但是只会有一个成功,
FeignRibbonClientAutoCOnfiguration类:
@ConditionalOnClass({ ILoadBalancer.class, Feign.class })
@ConditionalOnProperty(value = "spring.cloud.loadbalancer.ribbon.enabled",
      matchIfMissing = true)
@Configuration(proxyBeanMethods = false)

// 重点1:在FeignAutoConfiguration之前装载配置
@AutoConfigureBefore(FeignAutoConfiguration.class)
@EnableConfigurationProperties({ FeignHttpClientProperties.class })

@Import({ HttpClientFeignLoadBalancedConfiguration.class,
      OkHttpFeignLoadBalancedConfiguration.class,
      DefaultFeignLoadBalancedConfiguration.class }) // 重点2:
public class FeignRibbonClientAutoConfiguration {
    ...非重点...
}
|
|
@Configuration(proxyBeanMethods = false)
class DefaultFeignLoadBalancedConfiguration {

   @Bean
   @ConditionalOnMissingBean  // 如果Client类型的bean已经存在,则不执行
   public Client feignClient(CachingSpringLoadBalancerFactory cachingFactory,
         SpringClientFactory clientFactory) {
      return new LoadBalancerFeignClient(new Client.Default(null, null), cachingFactory,
            clientFactory);
   }

}
FeignLoadBalancerAutoConfiguration类:
@ConditionalOnClass(Feign.class)
@ConditionalOnBean(BlockingLoadBalancerClient.class)
@AutoConfigureBefore(FeignAutoConfiguration.class)

// 重点1:在FeignRibbonClientAutoConfiguration之后装载配置
@AutoConfigureAfter(FeignRibbonClientAutoConfiguration.class)
@EnableConfigurationProperties(FeignHttpClientProperties.class)
@Configuration(proxyBeanMethods = false)

@Import({ HttpClientFeignLoadBalancerConfiguration.class,
      OkHttpFeignLoadBalancerConfiguration.class,
      DefaultFeignLoadBalancerConfiguration.class })  // 重点2:
public class FeignLoadBalancerAutoConfiguration {
       ...非重点...
}
|
|
@Configuration(proxyBeanMethods = false)
class DefaultFeignLoadBalancerConfiguration {

   @Bean
   @ConditionalOnMissingBean  // 如果Client类型的bean已经存在,则不执行
   public Client feignClient(BlockingLoadBalancerClient loadBalancerClient) {
      return new FeignBlockingLoadBalancerClient(new Client.Default(null, null),
            loadBalancerClient);
   }

}
到这里就非常清晰了:
1. 通过spring.factories注入了两个配置类,并通过 @AutoConfigureBefore 和 @AutoConfigureAfter强制了两个配置类的装载顺序!
2. 这两个配置类各import 了 另一个配置类:DefaultFeignLoadBalancedConfiguration(注入:LoadBalancerFeignClient) 和 DefaultFeignLoadBalancerConfiguration(注入:FeignBlockingLoadBalancerClient),但是由于@ConditionalOnMissingBean注解,只有一个前面那个会注入成功!
所以,结论就是:IOC容器中的“Client”类型的 Bean 为 “LoadBalancerFeignClient”
所以,最终的结论就是:Openfeign通过的动态代理,为每个“@FeignClient”注解修饰的接口生成一个类型为 “LoadBalancerFeignClient”的代理类。
三、FeignClient代理类执行时,是如何使用Ribbon的?
1、当执行LoadBalancerFeignClient.execute()方法时:
// org.springframework.cloud.openfeign.ribbon.LoadBalancerFeignClient#execute
public Response execute(Request request, Request.Options options) throws IOException {
   try {
      URI asUri = URI.create(request.url());
      String clientName = asUri.getHost();
      URI uriWithoutHost = cleanUrl(request.url(), clientName);
      FeignLoadBalancer.RibbonRequest ribbonRequest = new FeignLoadBalancer.RibbonRequest(
            this.delegate, request, uriWithoutHost);

      // 可以获取到nacos的一些信息
      IClientConfig requestConfig = getClientConfig(options, clientName);

      // lbClient(clientName):可以获得具体的代理类,每个@FeignClient修饰的接口代理类时独立的
      return lbClient(clientName)
            .executeWithLoadBalancer(ribbonRequest, requestConfig).toResponse();
   }
   catch (ClientException e) {
      ......
   }
}
我们可以很清楚的看到,这里肯定会要用到Ribbon;
2、通过负载均衡器,执行调用,并返回结果:
// com.netflix.client.AbstractLoadBalancerAwareClient#executeWithLoadBalancer(...)
public T executeWithLoadBalancer(final S request, final IClientConfig requestConfig) throws ClientException {
    LoadBalancerCommand<T> command = buildLoadBalancerCommand(request, requestConfig);

    try {
        return command.submit(  // 这步会返回具体的,负载均衡选定好的Server
            new ServerOperation<T>() {
                @Override
                public Observable<T> call(Server server) {  // submit选好的Server作为入参
                    URI finalUri = reconstructURIWithServer(server, request.getUri());
                    S requestForServer = (S) request.replaceUri(finalUri);
                    try {
                        return Observable.just(AbstractLoadBalancerAwareClient.this.execute(requestForServer, requestConfig));
                    }
                    catch (Exception e) {
                        return Observable.error(e);
                    }
                }
            })
            .toBlocking()
            .single();
    } catch (Exception e) {
        ......
    }
}
|
|
// com.netflix.loadbalancer.reactive.LoadBalancerCommand#submit
public Observable<T> submit(final ServerOperation<T> operation) {
    final ExecutionInfoContext context = new ExecutionInfoContext();
    ......
    final int maxRetrysSame = retryHandler.getMaxRetriesOnSameServer();
    final int maxRetrysNext = retryHandler.getMaxRetriesOnNextServer();

    // selectServer()方法会通过负载均衡选择一台Server
    Observable<T> o = (server == null ? selectServer() : Observable.just(server))
            .concatMap(new Func1<Server, Observable<T>>() {
                ......
            });
}
3、selectServer()具体方法:
// com.netflix.loadbalancer.reactive.LoadBalancerCommand#selectServer
private Observable<Server> selectServer() {
    return Observable.create(new OnSubscribe<Server>() {
        @Override
        public void call(Subscriber<? super Server> next) {
            try {
                Server server = loadBalancerContext.getServerFromLoadBalancer(loadBalancerURI, loadBalancerKey);
                next.onNext(server);
                next.onCompleted();
            } catch (Exception e) {
                next.onError(e);
            }
        }
    });
}
4、这里将使用到非常重要的一个ZoneAwareLoadBalancer:
// com.netflix.loadbalancer.LoadBalancerContext#getServerFromLoadBalancer
public Server getServerFromLoadBalancer(@Nullable URI original, @Nullable Object loadBalancerKey) throws ClientException {
    String host = null;
    int port = -1;
    if (original != null) {
        host = original.getHost();
    }
    if (original != null) {
        Pair<String, Integer> schemeAndPort = deriveSchemeAndPortFromPartialUri(original);
        port = schemeAndPort.second();
    }

    // 关键一步,获得了一个ILoadBalancer
    ILoadBalancer lb = getLoadBalancer();
    if (host == null) {
        // 重要:这里其实获得的是ZoneAwareLoadBalancer类的Bean
        if (lb != null){
            Server svc = lb.chooseServer(loadBalancerKey);
            if (svc == null){
                throw new ClientException(ClientException.ErrorType.GENERAL,
                        "Load balancer does not have available server for client: "
                                + clientName);
            }
            host = svc.getHost();
            return svc;
        } else {
            ......
        }
    } else {
        ......
    }
    return new Server(host, port);
}
|
|
// com.netflix.loadbalancer.BaseLoadBalancer#chooseServer
public Server chooseServer(Object key) {
    if (!ENABLED.get() || getLoadBalancerStats().getAvailableZones().size() <= 1) {
        logger.debug("Zone aware logic disabled or there is only one zone");
        return super.chooseServer(key);
    }
    ...其它分支在国内一般不会走,没有zone的概念...
}
|
|
// com.netflix.loadbalancer.BaseLoadBalancer#chooseServer
public Server chooseServer(Object key) {
    if (counter == null) {
        counter = createCounter();
    }
    counter.increment();
    if (rule == null) {
        return null;
    } else {
        try {
            return rule.choose(key); // PredicateBasedRule
        } catch (Exception e) {
            return null;
        }
    }
}
|
|
// com.netflix.loadbalancer.PredicateBasedRule#choose
public Server choose(Object key) {
    ILoadBalancer lb = getLoadBalancer();
    Optional<Server> server = getPredicate().chooseRoundRobinAfterFiltering(lb.getAllServers(), key);
    if (server.isPresent()) {
        return server.get();
    } else {
        return null;
    }
}
5、可以看到 lb.getAllServer(),正是ZoneAwareLoadBalancer.getAllServers()方法:
// com.netflix.loadbalancer.BaseLoadBalancer#getAllServers
public class BaseLoadBalancer extends AbstractLoadBalancer {
    protected volatile List<Server> allServerList = Collections.synchronizedList(new ArrayList<Server>());

    public List<Server> getAllServers() {
        return Collections.unmodifiableList(allServerList);
    }
}
所以,我们现在用弄清楚的有两点:
-
为什么重要的ILoadBalancer的实现就是ZoneAwareLoadBalancer;
-
ZoneAwareLoadBalancer中的allServerList属性是何时被赋值的;
四、ZoneAwareLoadBalancer是何时注入的?
1、在spring-cloud-netfliex-ribbon包的spring.factories中有RibbonAutoConfiguration类:

我们看到这个类的构造方法,创建了一个SpringClientFactory工厂类:
@Configuration
@Conditional(RibbonAutoConfiguration.RibbonClassesConditions.class)
@RibbonClients
@AutoConfigureAfter(
      name = "org.springframework.cloud.netflix.eureka.EurekaClientAutoConfiguration")
@AutoConfigureBefore({ LoadBalancerAutoConfiguration.class,
      AsyncLoadBalancerAutoConfiguration.class })
@EnableConfigurationProperties({ RibbonEagerLoadProperties.class,
      ServerIntrospectorProperties.class })
public class RibbonAutoConfiguration {

   @Autowired(required = false)
   private List<RibbonClientSpecification> configurations = new ArrayList<>();

   @Autowired
   private RibbonEagerLoadProperties ribbonEagerLoadProperties;

   @Bean
   public HasFeatures ribbonFeature() {
      return HasFeatures.namedFeature("Ribbon", Ribbon.class);
   }

   @Bean
   public SpringClientFactory springClientFactory() {
       // SpringClientFactory这个Client工厂类很关键
      SpringClientFactory factory = new SpringClientFactory();
      factory.setConfigurations(this.configurations);
      return factory;
   }
}
我们再看看这个工厂类的构造方法做了什么事:
public class SpringClientFactory extends NamedContextFactory<RibbonClientSpecification> {

   static final String NAMESPACE = "ribbon";

   public SpringClientFactory() {
      super(RibbonClientConfiguration.class, NAMESPACE, "ribbon.client.name");
   }
}
|
|
public abstract class NamedContextFactory<C extends NamedContextFactory.Specification> implements DisposableBean, ApplicationContextAware {
    private final String propertySourceName;
    private final String propertyName;
    private Map<String, AnnotationConfigApplicationContext> contexts = new ConcurrentHashMap();
    private Map<String, C> configurations = new ConcurrentHashMap();
    private ApplicationContext parent;
    private Class<?> defaultConfigType;

    public NamedContextFactory(Class<?> defaultConfigType, String propertySourceName, String propertyName) {
        this.defaultConfigType = defaultConfigType;
        this.propertySourceName = propertySourceName;
        this.propertyName = propertyName;
    }
}
显然,构造了一个上下工厂“NamedContextFactory”类,这个工厂类的默认配置类是“RibbonClientConfiguraion”,这个在之后Feign的调用过程中非常关键;
2、LoadBalancerFeignClient这个代理类的execute()方法中:
// org.springframework.cloud.openfeign.ribbon.LoadBalancerFeignClient#execute
public Response execute(Request request, Request.Options options) throws IOException {
   try {
      URI asUri = URI.create(request.url());
      String clientName = asUri.getHost();
      URI uriWithoutHost = cleanUrl(request.url(), clientName);
      FeignLoadBalancer.RibbonRequest ribbonRequest = new FeignLoadBalancer.RibbonRequest(
            this.delegate, request, uriWithoutHost);

      // 这个方法不用讲,得到的IclientConfig肯定是RibbonClientConfiguraion
      IClientConfig requestConfig = getClientConfig(options, clientName);
      return lbClient(clientName)
            .executeWithLoadBalancer(ribbonRequest, requestConfig).toResponse();
   }
   catch (ClientException e) {
      ......
   }
}
|
|
// org.springframework.cloud.openfeign.ribbon.LoadBalancerFeignClient#getClientConfig
IClientConfig getClientConfig(Request.Options options, String clientName) {
    ......
    requestConfig = this.clientFactory.getClientConfig(clientName);
    ......
}
|
|
// org.springframework.cloud.netflix.ribbon.SpringClientFactory#getClientConfig
public IClientConfig getClientConfig(String name) {
   return getInstance(name, IClientConfig.class);
}
|
|
// org.springframework.cloud.netflix.ribbon.SpringClientFactory#getInstance
public <C> C getInstance(String name, Class<C> type) {
    // SpringClientFactory的super父类就是NamedContextFactory
   C instance = super.getInstance(name, type);
   if (instance != null) {
      return instance;
   }
   IClientConfig config = getInstance(name, IClientConfig.class);
   return instantiateWithConfig(getContext(name), type, config);
}
|
|
// org.springframework.cloud.context.named.NamedContextFactory#getInstance
public <T> T getInstance(String name, Class<T> type) {
    AnnotationConfigApplicationContext context = this.getContext(name);
    return BeanFactoryUtils.beanNamesForTypeIncludingAncestors(context, type).length > 0 ? context.getBean(type) : null;
}
找到了NamedContextFactory,就和第一点串起来了,它的默认配置类正是RibbonClientConfiguration;
3、RibbonClientConfiguration又是如何注入我们需要的ZoneAwareLoadBalancer的:
@Configuration(proxyBeanMethods = false)
@EnableConfigurationProperties
// Order is important here, last should be the default, first should be optional
// see
// https://github.com/spring-cloud/spring-cloud-netflix/issues/2086#issuecomment-316281653
@Import({ HttpClientConfiguration.class, OkHttpRibbonConfiguration.class,
      RestClientRibbonConfiguration.class, HttpClientRibbonConfiguration.class })
public class RibbonClientConfiguration {

    @Bean
    @ConditionalOnMissingBean
    public ILoadBalancer ribbonLoadBalancer(IClientConfig config,
          ServerList<Server> serverList, ServerListFilter<Server> serverListFilter,
          IRule rule, IPing ping, ServerListUpdater serverListUpdater) {
       if (this.propertiesFactory.isSet(ILoadBalancer.class, name)) {
          return this.propertiesFactory.get(ILoadBalancer.class, config, name);
       }

       // 默认注入的类正是ZoneAwareLoadBalancer
       return new ZoneAwareLoadBalancer<>(config, rule, ping, serverList,
             serverListFilter, serverListUpdater);
    }

}
所以,这就解释了,为什么在后面的 ILoadBalancer lb = getLoadBalancer(); 获得到的就是ZoneAwareLoadBalancer!
同时,这个类是在动态代理被执行execute()的时候被调起的,所以Ribbon也是在被使用时才从Nacos获取注册表的,并不是在容器启动时!
五、Ribbon又是何时从Nacos服务端获取allServerList的?
1、我们需要跟踪ZoneAwareLoadBalancer对应的Bean的构造过程:
// com.netflix.loadbalancer.ZoneAwareLoadBalancer#ZoneAwareLoadBalancer
public ZoneAwareLoadBalancer(IClientConfig clientConfig, IRule rule,
                             IPing ping, ServerList<T> serverList, ServerListFilter<T> filter,
                             ServerListUpdater serverListUpdater) {
    super(clientConfig, rule, ping, serverList, filter, serverListUpdater);
}
|
|
// com.netflix.loadbalancer.DynamicServerListLoadBalancer#DynamicServerListLoadBalancer
public DynamicServerListLoadBalancer(IClientConfig clientConfig, IRule rule, IPing ping,
                                     ServerList<T> serverList, ServerListFilter<T> filter,
                                     ServerListUpdater serverListUpdater) {
    super(clientConfig, rule, ping);
    this.serverListImpl = serverList;
    this.filter = filter;
    this.serverListUpdater = serverListUpdater;
    if (filter instanceof AbstractServerListFilter) {
        ((AbstractServerListFilter) filter).setLoadBalancerStats(getLoadBalancerStats());
    }

    //执行远程调用,并初始化BaseLoadBalancer中的allServerList
    restOfInit(clientConfig);
}
2、远程调用Nacos并初始化restOfInit()方法的逻辑:
void restOfInit(IClientConfig clientConfig) {
    boolean primeConnection = this.isEnablePrimingConnections();
    // turn this off to avoid duplicated asynchronous priming done in BaseLoadBalancer.setServerList()
    this.setEnablePrimingConnections(false);

    // 获取服务列表功能
    enableAndInitLearnNewServersFeature();

    updateListOfServers();
    if (primeConnection && this.getPrimeConnections() != null) {
        this.getPrimeConnections()
                .primeConnections(getReachableServers());
    }
    this.setEnablePrimingConnections(primeConnection);
}
|
|
public void enableAndInitLearnNewServersFeature() {
    serverListUpdater.start(updateAction);
}
这个updateAction变量是可执行的:
protected final ServerListUpdater.UpdateAction updateAction = new ServerListUpdater.UpdateAction() {
    @Override
    public void doUpdate() {
        updateListOfServers(); // 更新Servers列表
    }
};
3、updateListOfServer()方法如何从Nacos服务端获取服务列表:
// com.netflix.loadbalancer.DynamicServerListLoadBalancer#updateListOfServers
public void updateListOfServers() {
    List<T> servers = new ArrayList<T>();
    if (serverListImpl != null) {
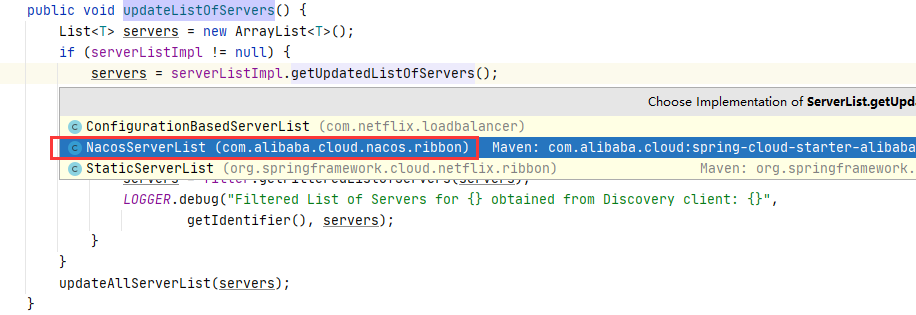
        // 其中的serverListImpl有三个实现,其中之一就是Nacos
        servers = serverListImpl.getUpdatedListOfServers();
        LOGGER.debug("List of Servers for {} obtained from Discovery client: {}",
                getIdentifier(), servers);

        if (filter != null) {
            servers = filter.getFilteredListOfServers(servers);
            LOGGER.debug("Filtered List of Servers for {} obtained from Discovery client: {}",
                    getIdentifier(), servers);
        }
    }

    // 用获得到的服务列表更新BaseLoadBalancer中的allServerList
    updateAllServerList(servers);
}
不用想了,肯定是NacosServerList,这个简单追踪就不赘述了!

NacosServerList.getUpdatedListOfServers()最终会调用nacos客户端的核心类 NacosNamingServer.selectInstances() 方法,该方法只会返回健康实例列表;
4、根据从nacos获得到的Servers,更新本地的allServerList属性:
// com.netflix.loadbalancer.DynamicServerListLoadBalancer#updateAllServerList
protected void updateAllServerList(List<T> ls) {
    // other threads might be doing this - in which case, we pass
    if (serverListUpdateInProgress.compareAndSet(false, true)) {
        try {
            for (T s : ls) {
                s.setAlive(true); // set so that clients can start using these
                                  // servers right away instead
                                  // of having to wait out the ping cycle.
            }
            setServersList(ls);
            super.forceQuickPing();
        } finally {
            serverListUpdateInProgress.set(false);
        }
    }
}
|
|
public void setServersList(List lsrv) {
    super.setServersList(lsrv);  // 核心
    List<T> serverList = (List<T>) lsrv;
    Map<String, List<Server>> serversInZones = new HashMap<String, List<Server>>();
    for (Server server : serverList) {
        // make sure ServerStats is created to avoid creating them on hot
        // path
        getLoadBalancerStats().getSingleServerStat(server);
        String zone = server.getZone();
        if (zone != null) {
            zone = zone.toLowerCase();
            List<Server> servers = serversInZones.get(zone);
            if (servers == null) {
                servers = new ArrayList<Server>();
                serversInZones.put(zone, servers);
            }
            servers.add(server);
        }
    }
    setServerListForZones(serversInZones);
}
|
|
// com.netflix.loadbalancer.BaseLoadBalancer#setServersList
public void setServersList(List lsrv) {
    Lock writeLock = allServerLock.writeLock();
    logger.debug("LoadBalancer [{}]: clearing server list (SET op)", name);

    ArrayList<Server> newServers = new ArrayList<Server>();
    writeLock.lock();
    try {
        ArrayList<Server> allServers = new ArrayList<Server>();

        ...对每一个Server进行下包装...

        allServerList = allServers; //本地的allServerList赋值
        if (canSkipPing()) {
            for (Server s : allServerList) {
                s.setAlive(true);
            }
            upServerList = allServerList;
        } else if (listChanged) {
            forceQuickPing();
        }
    } finally {
        writeLock.unlock();
    }
}
到这里,总算和 二.5 章节中的allServerList进行呼应了!
至此,整个从FeignClient注解生成动态代理类LoadBalancerFeignClient;
——> Client执行时会生成ribbon下的ZoneAwareLoadBalancer类,调用nacos服务端获取服务列表;
——> 在通过ZoneAwareLoadBalancer的父类的BaseLoadBalancer.chooseServer()方法根据负载均衡算法挑选一台服务器;
——> 最后交给Feign的的Client通过URL类完成调用。
六、Feign和Ribbon的重试机制
1、首先我们做两个事情:
服务提供者feign-provider:
@GetMapping("/get/{id}")
public String getById(@PathVariable("id") String id){
    System.out.println("被调用,时间:" + System.currentTimeMillis());
    try {
        TimeUnit.SECONDS.sleep(100);
    } catch (InterruptedException e) {
        e.printStackTrace();
    }
    return "feign-provider:com.jiguiquan.springcloud.controller.OrderController#getById=" + id;
}
服务消费者feign-consumer:
@GetMapping("test")
public String test(){
    return orderService.getById("100");
}
2、不配置任何重试机制,使用默认值:
调用接口后,看服务提供者的日志(重试了2次,时间间隔为1秒):

3、我们为系统注入Feign的默认Retryer重试机制:
@Bean
public Retryer retryer(){
   return new Retryer.Default();
}
再次调用,再看日志(重试了10次,):

4、Feign的默认重试器的核心代码(默认是不开启的):
public static class Default implements Retryer {
    private final int maxAttempts;
    private final long period;
    private final long maxPeriod;
    int attempt;
    long sleptForMillis;

    public Default() {
        // 默认的重试间隔时间100ms,最大间隔时间为1s,最大重试次数为5次
        this(100L, TimeUnit.SECONDS.toMillis(1L), 5);
    }

    // 默认下次重试间隔时间 100 * 1.5^(尝试轮次-1) 次方
    // 第一次尝试:100 * 1.5(2 -1) = 150ms; 以此类推
    long nextMaxInterval() {
        long interval = (long)((double)this.period * Math.pow(1.5D, (double)(this.attempt - 1)));
        return interval > this.maxPeriod ? this.maxPeriod : interval;
    }
}
5、Ribbon和Feign的重试器的源码就不过度追溯了,直接上结论:
-
Ribbon的重试机制默认是开启的,重试1次,共调用两次;
-
Feign的Retryer重试器默认是关闭的 NEVER_RETRY;
-
Feign如果想开启默认重试器,直接在Spring容器中注入 Retryer.Default 即可,默认重试5次;
6、修改Ribbon的默认重试机制:
# Ribbon 配置
ribbon:
  # 单节点最大重试次数(不包含默认调用的1次),达到最大值时,切换到下一个示例
  MaxAutoRetries: 0  # 0 相当于关闭ribbon重试

  # 更换下一个重试节点的最大次数,可以设置为服务提供者副本数(副本数 = 总机器数 - 1),也是就每个副本都查询一次
  MaxAutoRetriesNextServer: 0

  # 是否对所有请求进行重试,默认fasle,则只会对GET请求进行重试,建议配置为false,不然添加数据接口,会造成多条重复,也就是幂等性问题。
  OkToRetryOnAllOperations: false
7、自定义Feign重试机制(直接给 Retryer.Default 构造方法传参即可):
@Bean
public Retryer retryer(){
   return new Retryer.Default(100, 1000, 3); // 调用3次(包含原本的一次调用)
}
当然,如果对 Retryer.Dafault 的默认的方法逻辑不认可,可以直接实现一个自己的CustomRetryer注入到spring容器中即可:
@Bean
public Retryer customerRetryer(){
    return new Retryer() {
        @Override
        public void continueOrPropagate(RetryableException e) {

        }

        @Override
        public Retryer clone() {
            return null;
        }
    };
}


