对于这一类的基础服务,我还是绝得手动安装得方式更能让我心安!
docker安装的文章,参考这里: GitLab的安装与简单使用
一、使用清华镜像源安装
清华镜像源:https://mirrors.tuna.tsinghua.edu.cn/gitlab-ce/yum/
清华镜像源给的使用教程:https://mirror.tuna.tsinghua.edu.cn/help/gitlab-ce/
开始安装!
1、配置yum源:
vim /etc/yum.repos.d/gitlab-ce.repo

# 复制粘贴以下内容:
[gitlab-ce]
name=Gitlab CE Repository
baseurl=https://mirrors.tuna.tsinghua.edu.cn/gitlab-ce/yum/el$releasever/
gpgcheck=0
enabled=1
2、再执行以下两步:
sudo yum makecache

sudo yum install gitlab-ce #自动安装最新版
# sudo yum install gitlab-ce-x.x.x #安装指定版本

#查看gitlab的版本:
cat /opt/gitlab/embedded/service/gitlab-rails/VERSION

#卸载当前版本:
gitlab-ctl uninstall
yum remove gitlab-ce

#安装指定版本:
#具体版本信息可通过该链接查看:https://mirrors.tuna.tsinghua.edu.cn/gitlab-ce/yum/el7/
sudo yum install gitlab-ce-14.7.0-ce.0.el7.x86_64
二、Gitlab的启动和常用命令
1、Gitlab的配置文件位置:/etc/gitlab/gitlab.rb
vim /etc/gitlab/gitlab.rb

配置外部访问域名:
external_url 'http://gitlab.jiguiquan.com'
2、使配置重新生效并启动
gitlab-ctl reconfigure

# 关于初始账号密码的提示:
Notes:
Default admin account has been configured with following details:
Username: root
Password: You didn't opt-in to print initial root password to STDOUT.
Password stored to /etc/gitlab/initial_root_password. This file will be cleaned up in first reconfigure run after 24 hours.

# 查看状态
gitlab-ctl status
3、gitlab的其它常用命令:
gitlab-ctl start    # 启动所有 gitlab 组件;
gitlab-ctl stop        # 停止所有 gitlab 组件;
gitlab-ctl restart        # 重启所有 gitlab 组件;
gitlab-ctl status        # 查看服务状态;
vim /etc/gitlab/gitlab.rb        # 修改gitlab配置文件;
gitlab-ctl reconfigure        # 重新编译gitlab的配置;
gitlab-rake gitlab:check SANITIZE=true --trace    # 检查gitlab;
gitlab-ctl tail        # 查看日志;
gitlab-ctl tail nginx/gitlab_access.log
三、Gitlab502问题解决思路

因为Gitlab里面涉及到的服务太多了,所以可能导致的原因很多很多,所以只将思路;
1、纯粹就是启动慢,一定要给它时间!
2、正常情况下最容易碰到的问题是,端口被占用:
2.1、查看服务状态
[root@tcosmo-szls01 gitlab]# gitlab-ctl status
run: alertmanager: (pid 47345) 3083s; run: log: (pid 39732) 4609s
run: gitaly: (pid 47374) 3083s; run: log: (pid 38290) 4745s
run: gitlab-exporter: (pid 47436) 3083s; run: log: (pid 39461) 4629s
run: gitlab-workhorse: (pid 47464) 3082s; run: log: (pid 39111) 4650s
run: grafana: (pid 60395) 567s; run: log: (pid 40223) 4561s
run: logrotate: (pid 47533) 3081s; run: log: (pid 38080) 4763s
run: nginx: (pid 60308) 568s; run: log: (pid 39286) 4645s
run: node-exporter: (pid 47624) 3080s; run: log: (pid 39395) 4635s
run: postgres-exporter: (pid 47630) 3080s; run: log: (pid 39834) 4605s
run: postgresql: (pid 47640) 3080s; run: log: (pid 38465) 4733s
run: prometheus: (pid 47644) 3079s; run: log: (pid 39641) 4617s
run: puma: (pid 62674) 27s; run: log: (pid 38876) 4664s
run: redis: (pid 47731) 3079s; run: log: (pid 38133) 4752s
run: redis-exporter: (pid 47740) 3078s; run: log: (pid 39567) 4621s
run: sidekiq: (pid 60222) 585s; run: log: (pid 38910) 4658s
2.2、看到puma服务启动时间不正常,所以我们详细的查看puma服务的日志:
[root@tcosmo-szls01 gitlab]# gitlab-ctl tail puma
2022-01-25_04:25:18.93538   /opt/gitlab/embedded/bin/puma:23:in `<top (required)>'
2022-01-25_04:25:19.82282 {"timestamp":"2022-01-25T04:25:19.822Z","pid":62825,"message":"Puma starting in cluster mode..."}
2022-01-25_04:25:19.82285 {"timestamp":"2022-01-25T04:25:19.822Z","pid":62825,"message":"* Puma version: 5.5.2 (ruby 2.7.5-p203) (\"Zawgyi\")"}
2022-01-25_04:25:19.82285 {"timestamp":"2022-01-25T04:25:19.822Z","pid":62825,"message":"*  Min threads: 4"}
2022-01-25_04:25:19.82286 {"timestamp":"2022-01-25T04:25:19.822Z","pid":62825,"message":"*  Max threads: 4"}
2022-01-25_04:25:19.82286 {"timestamp":"2022-01-25T04:25:19.822Z","pid":62825,"message":"*  Environment: production"}
2022-01-25_04:25:19.82287 {"timestamp":"2022-01-25T04:25:19.822Z","pid":62825,"message":"*   Master PID: 62825"}
2022-01-25_04:25:19.82289 {"timestamp":"2022-01-25T04:25:19.822Z","pid":62825,"message":"*      Workers: 80"}
2022-01-25_04:25:19.82290 {"timestamp":"2022-01-25T04:25:19.822Z","pid":62825,"message":"*     Restarts: (✔) hot (✖) phased"}
2022-01-25_04:25:19.82293 {"timestamp":"2022-01-25T04:25:19.822Z","pid":62825,"message":"* Preloading application"}
2022-01-25_04:25:53.14976 {"timestamp":"2022-01-25T04:25:53.149Z","pid":62825,"message":"* Listening on unix:///var/opt/gitlab/gitlab-rails/sockets/gitlab.socket"}
2022-01-25_04:25:53.14993 bundler: failed to load command: puma (/opt/gitlab/embedded/bin/puma)
2022-01-25_04:25:53.14999 Errno::EADDRINUSE: Address already in use - bind(2) for "127.0.0.1" port 8080

## 罪魁祸首在这里,puma服务默认需要使用8080端口,但是8080端口被占用了
2.3、解决问题
如果不是主要服务,我们就可以把那个服务停掉;
如果不能停,那我们就去修改puma服务默认的端口
vim /etc/gitlab/gitlab.rb

# 修改puma服务默认的端口
### Advanced settings
# puma['listen'] = '127.0.0.1'
 puma['port'] = 8090  ## 这里
# puma['socket'] = '/var/opt/gitlab/gitlab-rails/sockets/gitlab.socket'
# puma['somaxconn'] = 1024

# 之后我们让配置生效并重启服务
gitlab-ctl reconfigure
之后服务就可以正常访问了:

四、Gitlab的使用
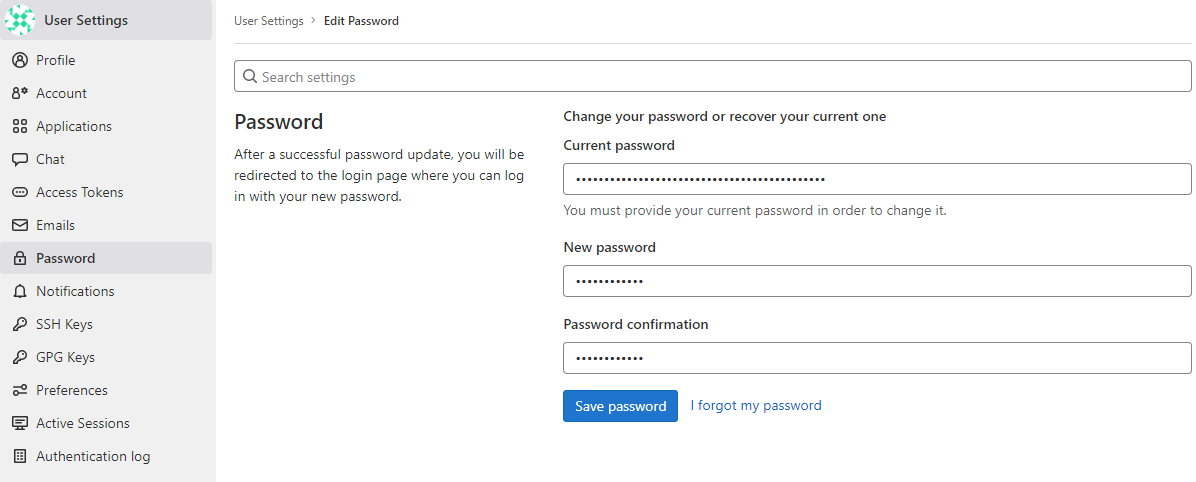
1、获得初始密码,并修改初始root密码:
[root@tcosmo-szls01 gitlab]# cat /etc/gitlab/initial_root_password|grep Password:
Password: bimCiS46btIEfFn/03A0gVA8EuriTjuRrqtJhwvl5vo=
登录后立即修改初始密码:
2、Gitlab的几个重要目录
配置文件目录:/etc/gitlab/
日志文件目录:/var/log/gitlab/
data数据目录:/var/opt/gitlab/
补充一:重要:Gitlab的数据备份:
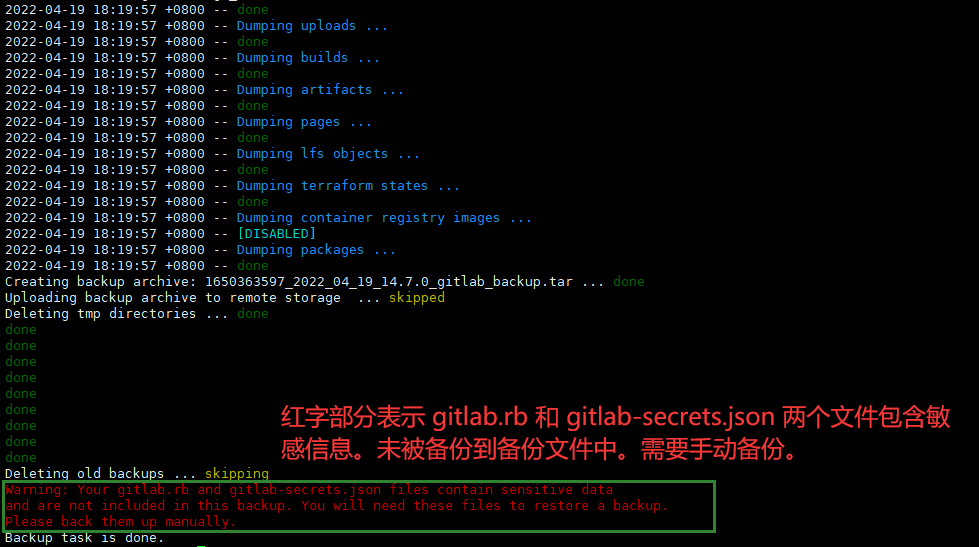
1、手动备份:
gitlab-rake gitlab:backup:create

# 上面的命令会将gitlab的数据备份到//var/opt/gitlab/backups目录下,包含:gitlab仓库、数据库、用户、用户组、用户密钥、权限等完整信息。
[root@tcosmo-szls01 backups]# pwd
/var/opt/gitlab/backups
[root@tcosmo-szls01 backups]# ll -h
total 243M
-rw------- 1 git git 243M Apr 19 18:19 1650363597_2022_04_19_14.7.0_gitlab_backup.tar
2、自动备份(每天凌晨4点执行备份,且只保留7天)
2.1、修改备份有效期,只保留7天
vim /etc/gitlab/gitlab.rb
# 显示行号 :set nu

# 大概在564行:
gitlab_rails['backup_keep_time'] = 604800   ##配置为7天

配置完成后,执行以下命令使配置生效:
gitlab-ctl reconfigure

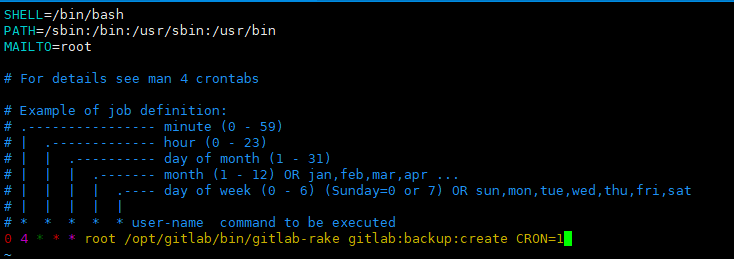
2.2、借助系统crontab命令实现每天凌晨4点定时备份:
vim /etc/crontab
0 4 * * * root /opt/gitlab/bin/gitlab-rake gitlab:backup:create CRON=1
重启crontab服务:
systemctl restart crond
3、接下来就是重要的恢复时刻啦:
3.1、首先将其它地方的备份文件拷贝到目标gitlab的 /var/opt/gitlab/backups/ 目录下:
[root@tcosmo-szlstb03 backups]# pwd
/var/opt/gitlab/backups

[root@tcosmo-szlstb03 backups]# chmod 777 1652558427_2022_05_15_14.7.0_gitlab_backup.tar  #修改下此文件的权限

[root@tcosmo-szlstb03 backups]# ll
total 463020
-rwxrwxrwx 1 root root 474132480 May 15 14:00 1652558427_2022_05_15_14.7.0_gitlab_backup.tar
3.2、停止数据库连接服务:
[root@tcosmo-szlstb03 backups]# gitlab-ctl stop puma && gitlab-ctl stop sidekiq
ok: down: puma: 0s, normally up
ok: down: sidekiq: 0s, normally up

[root@tcosmo-szlstb03 backups]# gitlab-ctl status
run: alertmanager: (pid 127725) 2368s; run: log: (pid 125865) 2462s
run: gitaly: (pid 127446) 2376s; run: log: (pid 124540) 2594s
run: gitlab-exporter: (pid 127391) 2379s; run: log: (pid 125602) 2482s
run: gitlab-kas: (pid 134202) 1829s; run: log: (pid 124881) 2579s
run: gitlab-workhorse: (pid 127361) 2380s; run: log: (pid 125421) 2499s
run: grafana: (pid 134276) 1828s; run: log: (pid 126913) 2407s
run: logrotate: (pid 124415) 2609s; run: log: (pid 124450) 2608s
run: nginx: (pid 134237) 1828s; run: log: (pid 125463) 2493s
run: node-exporter: (pid 127384) 2380s; run: log: (pid 125570) 2488s
run: postgres-exporter: (pid 127739) 2367s; run: log: (pid 126033) 2456s
run: postgresql: (pid 124683) 2586s; run: log: (pid 124695) 2585s
run: prometheus: (pid 131596) 2155s; run: log: (pid 125676) 2470s
down: puma: 29s, normally up; run: log: (pid 125345) 2511s
run: redis: (pid 124479) 2603s; run: log: (pid 124491) 2602s
run: redis-exporter: (pid 127393) 2379s; run: log: (pid 125625) 2476s
down: sidekiq: 29s, normally up; run: log: (pid 125370) 2505s
3.3、之前restore备份恢复操作:
[root@tcosmo-szlstb03 backups]# gitlab-rake gitlab:backup:restore BACKUP=1652558427_2022_05_15_14.7.0
2022-05-15 14:15:58 +0800 -- Unpacking backup ...
2022-05-15 14:15:59 +0800 -- Unpacking backup ... done
GitLab version mismatch:
  Your current GitLab version (14.10.2) differs from the GitLab version in the backup!
  Please switch to the following version and try again:
  version: 14.7.0
这里的意思是,目标GItlab版本与备份文件版本不一致,所以Gitlab的备份恢复必须保持Gitlab版本一致!
乖乖切换对应的Gitlab版本吧!
3.4、最后重启下Gitlab吧:
gitlab-ctl start
补充二、Gitlab一些细节配置
1、Gitlab仓库允许的最大上传文件配置:
修改核心配置文件/etc/gitlab/gitlab.rb中的Nginx配置:
vim /etc/gitlab/gitlab.rb

nginx['client_max_body_size'] = '1024m'

#然后重启服务
gitlab-ctl reconfigure
补充三、Gitlab之Git LFS大文件存储
1、修改gitlab核心配置文件:
vim config/gitlab.yml:

### Git LFS
gitlab_rails['lfs_enabled'] = true
#默认位置:`/var/opt/gitlab/gitlab-rails/shared/lfs-objects`
gitlab_rails['lfs_storage_path'] = "/data/gitlab/lfs-objects"
2、重启gitlab:
gitlab-ctl reconfigure
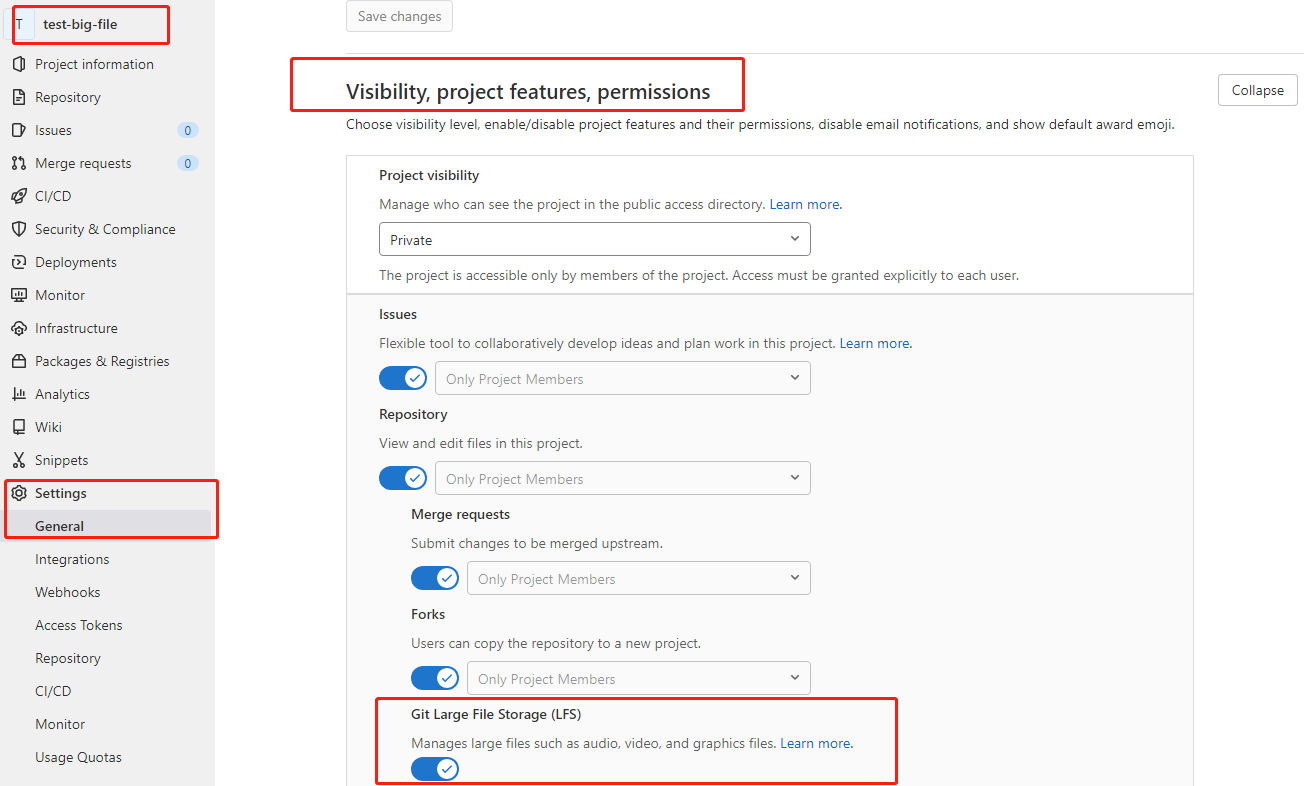
3、之后正常情况下,所有的项目就都支持LFS了,也可以关闭:
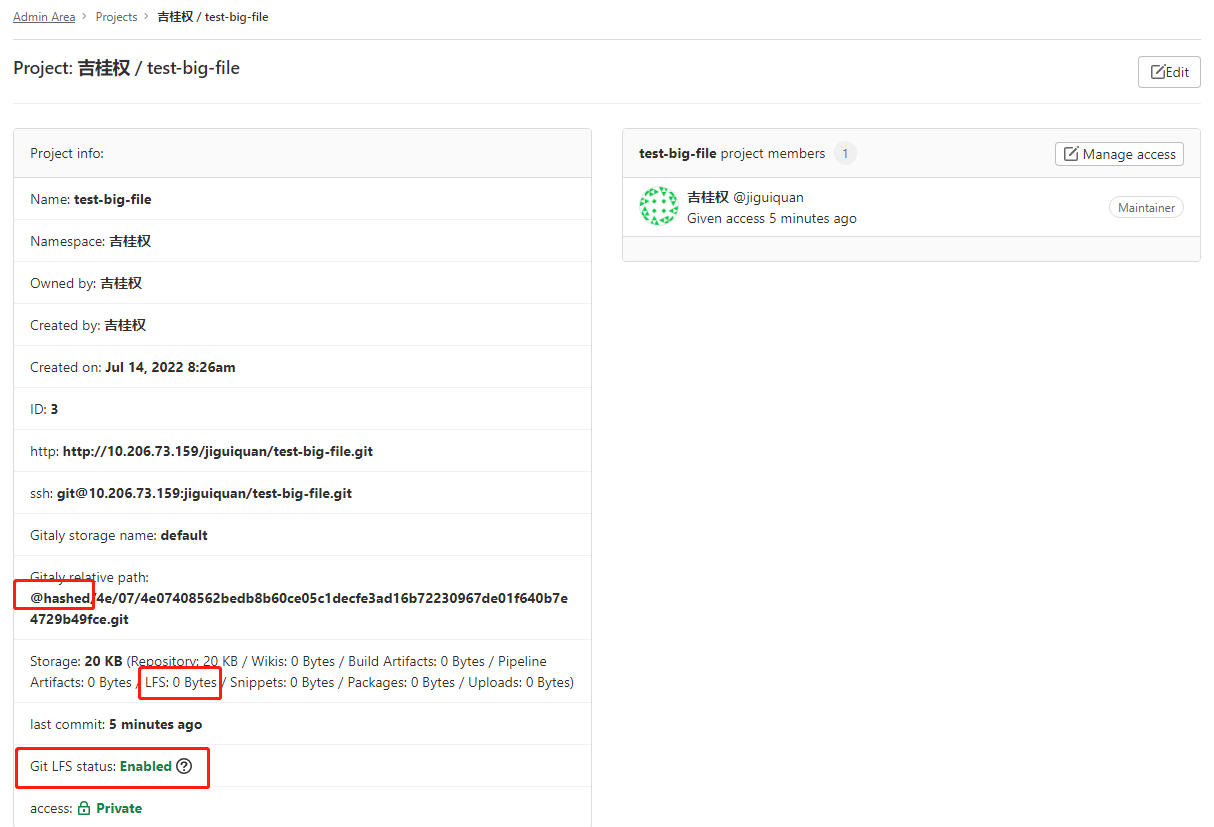
4、通过管理员账号Admin Area——>overview——>project时,还可以看到项目的详细预览信息:
5、在推送代码时,需要执行git lfs track 命令指定存入lfs的文件后缀:
现在我将要测试上传一个大文件 + 小文件到gitlab,同时让大文件存放到“/data/gitlab/lfs-objects”
# 标记哪些文件需要通过lfs存储
$ git lfs track "*.vep"
Tracking "*.vep"

# 查看自动生成得.gitattributes文件
$ cat .gitattributes
*.vep filter=lfs diff=lfs merge=lfs -text

# 添加文件
$ git add .

# commit提交
$ git commit -m "first test large file"
[main 3357c89] first test large file
 3 files changed, 5 insertions(+)
 create mode 100644 .gitattributes
 create mode 100644 big-file.vep
 create mode 100644 small-file.txt

# push到远程gitlab
$ git push origin main
info: detecting host provider for 'http://10.206.73.159/'...
info: detecting host provider for 'http://10.206.73.159/'...
info: detecting host provider for 'http://10.206.73.159/'...
info: detecting host provider for 'http://10.206.73.159/'...
Locking support detected on remote "origin". Consider enabling it with:
  $ git config lfs.http://10.206.73.159/jiguiquan/test-big-file.git/info/lfs.locksverify true
Uploading LFS objects:   0% (0/1), 37 MB | 3.3 MB/s
...
Uploading LFS objects:   0% (0/1), 862 MB | 3.6 MB/s
...
Uploading LFS objects: 100% (1/1), 1.3 GB | 3.7 MB/s, done.
Enumerating objects: 6, done.
Counting objects: 100% (6/6), done.
Delta compression using up to 4 threads
Compressing objects: 100% (3/3), done.
Writing objects: 100% (5/5), 540 bytes | 270.00 KiB/s, done.
Total 5 (delta 0), reused 0 (delta 0), pack-reused 0
To http://10.206.73.159/jiguiquan/test-big-file.git
   ac6319f..3357c89  main -> main
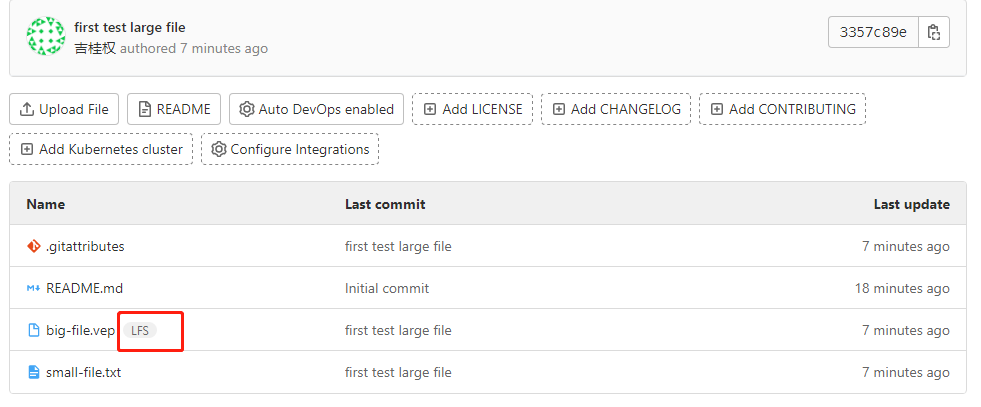
6、上传文成后,我们去Gitlab中查看,可以看到对应的大文件有个特殊小标志:
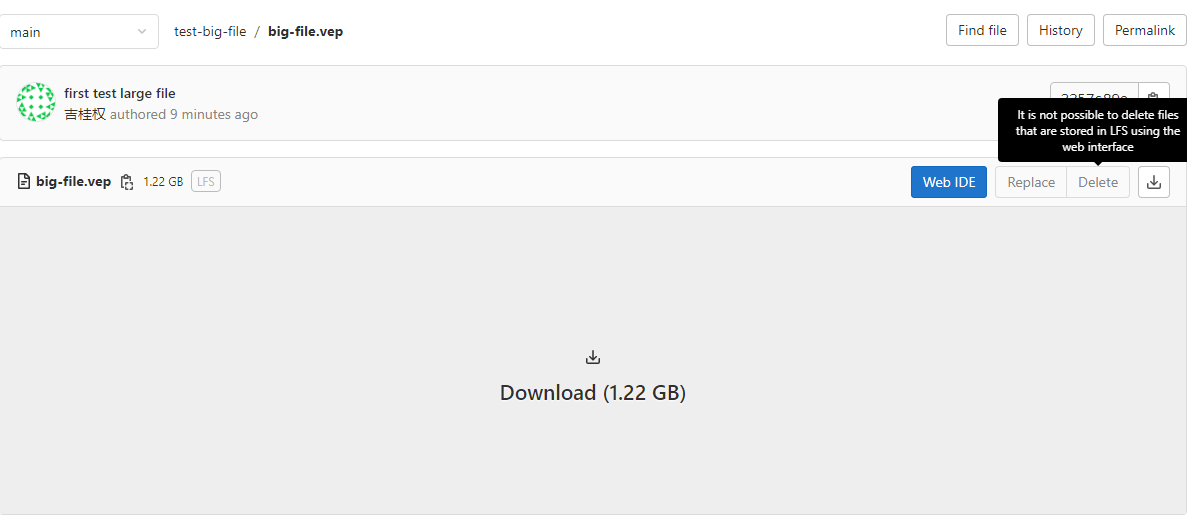
同时,LFS大文件时无法在代码中直接删除的!
7、到我们配置得LFS路径下看看,是不是确实有这个大文件:
[root@node1 lfs-objects]# pwd
/data/gitlab/lfs-objects
[root@node1 lfs-objects]# ls
a9  tmp
[root@node1 lfs-objects]# tree
.
├── a9
│   └── d3
│        └── 9518c7f4f5426781bbbd90cf50169581e03b2f265d0b2443dff35c81ce80
└── tmp
    ├── cache
    ├── uploads
    └── work

6 directories, 1 file
[root@node1 lfs-objects]# cd a9/d3/
[root@node1 d3]# ll -h
total 1.3G
-rw-r--r--. 1 git git 1.3G Jul 14 16:43 9518c7f4f5426781bbbd90cf50169581e03b2f265d0b2443dff35c81ce80
通过文件大小直到,肯定即使我们上传得那个大文件!
8、最后,肯定还得要测一下clone下载正不正常(git lfs clone …):
# 通过git lfs clone 完成对包含LFS的项目的clone
$ git lfs clone http://10.206.73.159/jiguiquan/test-big-file.git
WARNING: 'git lfs clone' is deprecated and will not be updated
          with new flags from 'git clone'

'git clone' has been updated in upstream Git to have comparable
speeds to 'git lfs clone'.
Cloning into 'test-big-file'...
info: detecting host provider for 'http://10.206.73.159/'...
info: detecting host provider for 'http://10.206.73.159/'...
remote: Enumerating objects: 8, done.
remote: Counting objects: 100% (8/8), done.
remote: Compressing objects: 100% (4/4), done.
remote: Total 8 (delta 0), reused 0 (delta 0), pack-reused 0
Receiving objects: 100% (8/8), done.
info: detecting host provider for 'http://10.206.73.159/'...
info: detecting host provider for 'http://10.206.73.159/'...
Downloading LFS objects:   0% (0/1), 92 MB | 3.7 MB/s
...
Downloading LFS objects:   0% (0/1), 501 MB | 2.0 MB/s
...
Receiving objects: 100% (8/8), done.
info: detecting host provider for 'http://10.206.73.159/'...
info: detecting host provider for 'http://10.206.73.159/'...
Downloading LFS objects: 100% (1/1), 1.3 GB | 1.6 MB/s
大文件Clone正常:


