一、Kubesphere简单介绍
官方网站1:https://kubesphere.qingcloud.com/
KubeSphere 是基于 Kubernetes 构建的分布式、多租户、多集群、企业级开源容器平台,具有强大且完善的网络与存储能力,并通过极简的人机交互提供完善的多集群管理、CI / CD 、微服务治理、应用管理等功能,帮助企业在云、虚拟化及物理机等异构基础设施上快速构建、部署及运维容器架构,实现应用的敏捷开发与全生命周期管理。
基于Kubernetes的可视化界面
多租户能力,租户隔离,细粒度权限控制
多集群管理功能(可以对多个环节的K8s环境隔离管理)
自带CI/CD(类似于Jenkins)
微服务治理(服务网格)
应用管理(应用商店等)
完整的集群监控,日志收集管理等功能
二、安装Kubesphere集群安装——准备工作
Kubesphere平台的安装有很多方式:参考官方教程:https://www.kubesphere.io/zh/
可以在现有的Kubernetes环境上安装;
可以在Linux系统上单节点快速部署Kubesphere;
可以在Linux系统上多节点部署Kubesphere集群;https://www.kubesphere.io/zh/docs/v3.3/installing-on-linux/introduction/multioverview/
本文主要就实战Linux系统上多节点集群安装了!
1、系统要求
我使用的是3台 4核16G的ECS云服务器 —— CentOS7.9
##查看当前Centos版本
cat /etc/redhat-release
配置每个机器的hostname
##设置hostname(master,node1,node2)
hostnamectl set-hostname master

##查看hostname
hostnamectl status
各机器之间可以使用ssh连接登录
ssh root@10.130.59.50 ##内网互通
关闭 selinux 和 swap(貌似kubesphere会自动完成)
#关闭 selinux:
## 修改selinux后防止不能重启,执行该命令先:touch /.autorelabel
sed -i 's/enforcing/disabled/' /etc/selinux/config #需要重启
setenforce 0  #宽容模式
查看:
getenforce

#关闭 swap:
swapoff -a
sed -ri 's/.*swap.*/#&/' /etc/fstab
#通过free -m确保swap分区都为0即完成
ipv4流量桥接(貌似kubesphere会自动完成):
#将桥接的 IPv4 流量传递到 iptables 的链:
# 修改 /etc/sysctl.conf
# 如果有配置,则修改
sed -i "s#^net.ipv4.ip_forward.*#net.ipv4.ip_forward=1#g"  /etc/sysctl.conf
sed -i "s#^net.bridge.bridge-nf-call-ip6tables.*#net.bridge.bridge-nf-call-ip6tables=1#g"  /etc/sysctl.conf
sed -i "s#^net.bridge.bridge-nf-call-iptables.*#net.bridge.bridge-nf-call-iptables=1#g"  /etc/sysctl.conf
sed -i "s#^net.ipv6.conf.all.disable_ipv6.*#net.ipv6.conf.all.disable_ipv6=1#g"  /etc/sysctl.conf
sed -i "s#^net.ipv6.conf.default.disable_ipv6.*#net.ipv6.conf.default.disable_ipv6=1#g"  /etc/sysctl.conf
sed -i "s#^net.ipv6.conf.lo.disable_ipv6.*#net.ipv6.conf.lo.disable_ipv6=1#g"  /etc/sysctl.conf
sed -i "s#^net.ipv6.conf.all.forwarding.*#net.ipv6.conf.all.forwarding=1#g"  /etc/sysctl.conf
# 可能没有,追加
echo "net.ipv4.ip_forward = 1" >> /etc/sysctl.conf
echo "net.bridge.bridge-nf-call-ip6tables = 1" >> /etc/sysctl.conf
echo "net.bridge.bridge-nf-call-iptables = 1" >> /etc/sysctl.conf
echo "net.ipv6.conf.all.disable_ipv6 = 1" >> /etc/sysctl.conf
echo "net.ipv6.conf.default.disable_ipv6 = 1" >> /etc/sysctl.conf
echo "net.ipv6.conf.lo.disable_ipv6 = 1" >> /etc/sysctl.conf
echo "net.ipv6.conf.all.forwarding = 1"  >> /etc/sysctl.conf
# 执行命令以应用
sysctl -p
时间同步
## 查看
tiemdatectl
查看磁盘空间
##列出硬盘(包含挂载的外部硬盘)
fdisk -l
2、安装运行时环境docker
具体安装的docker版本,可以根据文档要求来,我安装的是19.3.9
https://kubesphere.com.cn/docs/installing-on-linux/introduction/multioverview/#容器运行时
安装docker,参考另一篇文章:
http://www.jiguiquan.com/?p=286
3、安装依赖的软件,最好都安装一下
https://kubesphere.com.cn/docs/installing-on-linux/introduction/multioverview/#依赖项要求
yum install -y socat
yum install -y conntrack
yum install -y ebtables
yum install -y ipset
4、开放服务器安全组开放端口
端口开放要求参考:https://kubesphere.com.cn/docs/installing-on-linux/introduction/port-firewall/
三、正式安装
1、在master节点下载KubeKey
-
如果当前机器可以直接访问github:
curl -sfL https://get-kk.kubesphere.io | VERSION=v1.2.0 sh -
chmod +x kk
-
如果当前机器访问github受限:
export KKZONE=cn
curl -sfL https://get-kk.kubesphere.io | VERSION=v1.2.0 sh -
chmod +x kk
2、借助kk命令,创建集群配置文件
./kk create config --with-kubernetes v1.20.4 --with-kubesphere v3.1.1

[root@master ~]# ls ##查看当前列表
config-sample.yaml  kk  kubekey-v1.2.0-linux-amd64.tar.gz  README.md  README_zh-CN.md
3、修改配置文件config-sample.yaml:
apiVersion: kubekey.kubesphere.io/v1alpha1
kind: Cluster
metadata:
name: sample
spec:
hosts: #修改位置1(内网IP)
- {name: master, address: 10.130.59.50, internalAddress: 10.130.59.50, user: root, password: yourpwd}
- {name: node1, address: 10.130.41.15, internalAddress: 10.130.41.15, user: root, password: yourpwd}
- {name: node2, address: 10.130.59.49, internalAddress: 10.130.59.49, user: root, password: yourpwd}
## 如果使用ssh免密登录,则需要使用privateKeyPath
## - {name: node2, address: 10.130.59.49, internalAddress: 10.130.59.49, user: root, privateKeyPath: "~/.ssh/id_rsa"}
roleGroups: #修改位置2
etcd:
- master
master:
- master
worker:
- node1
- node2
controlPlaneEndpoint:
domain: lb.kubesphere.local
address: ""
port: 6443
kubernetes:
version: v1.20.4
imageRepo: kubesphere
clusterName: cluster.local
network:
plugin: calico
kubePodsCIDR: 10.233.64.0/18
kubeServiceCIDR: 10.233.0.0/18
registry:
registryMirrors: []
insecureRegistries: []
addons: []
---
apiVersion: installer.kubesphere.io/v1alpha1
kind: ClusterConfiguration
metadata:
name: ks-installer
namespace: kubesphere-system
labels:
version: v3.1.1
spec:
persistence:
storageClass: ""
authentication:
jwtSecret: ""
zone: ""
local_registry: ""
etcd:
monitoring: false
endpointIps: localhost
port: 2379
tlsEnable: true
common:
redis:
enabled: false
redisVolumSize: 2Gi
openldap:
enabled: false
openldapVolumeSize: 2Gi
minioVolumeSize: 20Gi
monitoring:
endpoint: http://prometheus-operated.kubesphere-monitoring-system.svc:9090
es:
elasticsearchMasterVolumeSize: 4Gi
elasticsearchDataVolumeSize: 20Gi
logMaxAge: 7
elkPrefix: logstash
basicAuth:
enabled: false
username: ""
password: ""
externalElasticsearchUrl: ""
externalElasticsearchPort: ""
console:
enableMultiLogin: true
port: 30880
alerting:
enabled: false
# thanosruler:
# replicas: 1
# resources: {}
auditing:
enabled: false
devops:
enabled: false
jenkinsMemoryLim: 2Gi
jenkinsMemoryReq: 1500Mi
jenkinsVolumeSize: 8Gi
jenkinsJavaOpts_Xms: 512m
jenkinsJavaOpts_Xmx: 512m
jenkinsJavaOpts_MaxRAM: 2g
events:
enabled: false
ruler:
enabled: true
replicas: 2
logging:
enabled: false
logsidecar:
enabled: true
replicas: 2
metrics_server:
enabled: false
monitoring:
storageClass: ""
prometheusMemoryRequest: 400Mi
prometheusVolumeSize: 20Gi
multicluster:
clusterRole: none
network:
networkpolicy:
enabled: false
ippool:
type: none
topology:
type: none
openpitrix:
store:
enabled: false
servicemesh:
enabled: false
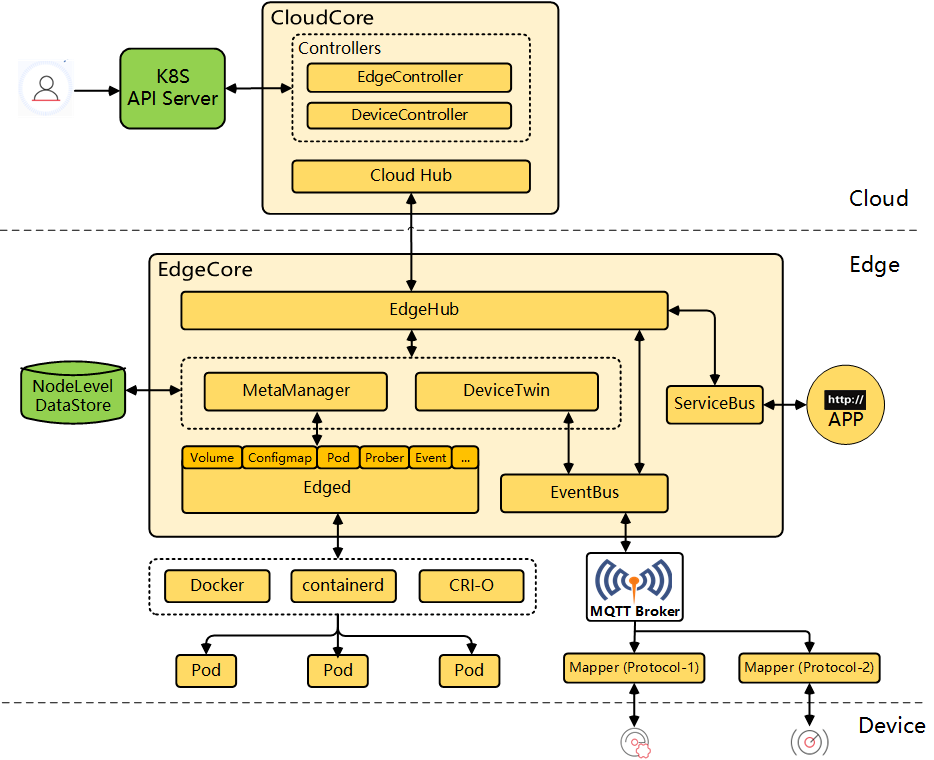
kubeedge:
enabled: false
cloudCore:
nodeSelector: {"node-role.kubernetes.io/worker": ""}
tolerations: []
cloudhubPort: "10000"
cloudhubQuicPort: "10001"
cloudhubHttpsPort: "10002"
cloudstreamPort: "10003"
tunnelPort: "10004"
cloudHub:
advertiseAddress:
- ""
nodeLimit: "100"
service:
cloudhubNodePort: "30000"
cloudhubQuicNodePort: "30001"
cloudhubHttpsNodePort: "30002"
cloudstreamNodePort: "30003"
tunnelNodePort: "30004"
edgeWatcher:
nodeSelector: {"node-role.kubernetes.io/worker": ""}
tolerations: []
edgeWatcherAgent:
nodeSelector: {"node-role.kubernetes.io/worker": ""}
tolerations: []
4、引导创建集群
./kk create cluster -f config-sample.yaml

5、如果我们想查看安装进度,则可以使用以下命令:
kubectl logs -n kubesphere-system $(kubectl get pod -n kubesphere-system -l app=ks-install -o jsonpath='{.items[0].metadata.name}') -f
6、安装成功后

上面访问的ip是内网ip,我们可以修改为公网IP(master、node1、node2中的任意一台都可以!)
第一次登录,会需要我们修改一下密码:

之后就是Kubesphere的实战环节啦!
补充一、安装 kubectl 命令自动补全
# 安装
yum install bash-completion

# 自动补全
echo 'source <(kubectl completion bash)' >>~/.bashrc
kubectl completion bash >/etc/bash_completion.d/kubectl
source /usr/share/bash-completion/bash_completion